


Shopify’s built-in tools and most Zoho CRM integration guides only handle one kind of data: orders, customers, and products moving from your store into Zoho automatically. None of them explain what happens when a shopper fills out a wholesale inquiry, a quote request, or a plain contact form on your site. That submission just sits in an email inbox instead of showing up as a lead your sales team can work.
If your Shopify store collects leads through a contact form, those submissions need somewhere to go. Copying names and emails into a CRM by hand works for a handful of leads a week. It stops working once volume picks up.
This guide walks through a full Shopify Zoho CRM integration using IPS – Contact Form to Any API. It covers everything from creating a Zoho OAuth application to authorizing the connection, mapping form fields, and checking the logs after a submission goes through. The connection uses OAuth 2.0, which means you authorize it once and reuse it instead of generating a new access token every time it expires.
By the end, your Shopify contact form will send its submissions straight to Zoho CRM, and you’ll know how to confirm each request actually went through.
What You Need Before Starting
Before opening the Zoho API Console, make sure you have:
- Access to your Shopify admin
- IPS – Contact Form to Any API installed on your store
- Access to the Zoho account you want to connect
- Access to the Zoho API Console
- Permission to create an OAuth application inside your Zoho account
Over the course of this guide, you’ll create three things, in this order:
- A Zoho OAuth application, which gives you a Client ID and Client Secret
- An OAuth connection inside IPS – Contact Form to Any API, built from those credentials
- An API integration that uses the OAuth connection to send form data to Zoho CRM
Each of these builds on the one before it, so it helps to do them in sequence rather than jumping ahead.
How the Shopify–Zoho CRM Integration Works
Here’s the full sequence before we get into the details of each step:
- Create a Zoho OAuth application.
- Get the Client ID and Client Secret.
- Add those credentials to an OAuth connection in IPS – Contact Form with API.
- Authorize the connection with Zoho.
- Test the connection.
- Create a new API integration.
- Select OAuth 2.0 (OAuth connection) as the authentication method.
- Select the saved Zoho OAuth connection.
- Configure the API request and form field mapping.
- Save the integration.
- Submit a test form and check the result in Integration Logs.
Once the OAuth connection is set up and authorized, it does the heavy lifting. You won’t need to touch the Zoho Client ID or Client Secret again after this point, even if you build more integrations later.
Part 1: Create the Zoho OAuth Application
Step 1: Open the Zoho API Console
Go to the Zoho API Console and sign in using the Zoho account that will authorize the CRM connection. This should be the account tied to the Zoho CRM organization you want the leads to land in.
Step 2: Create a New Zoho Client
Inside the API Console:
- Click Get Started.
- Select Server-based Applications.
- Click Create.
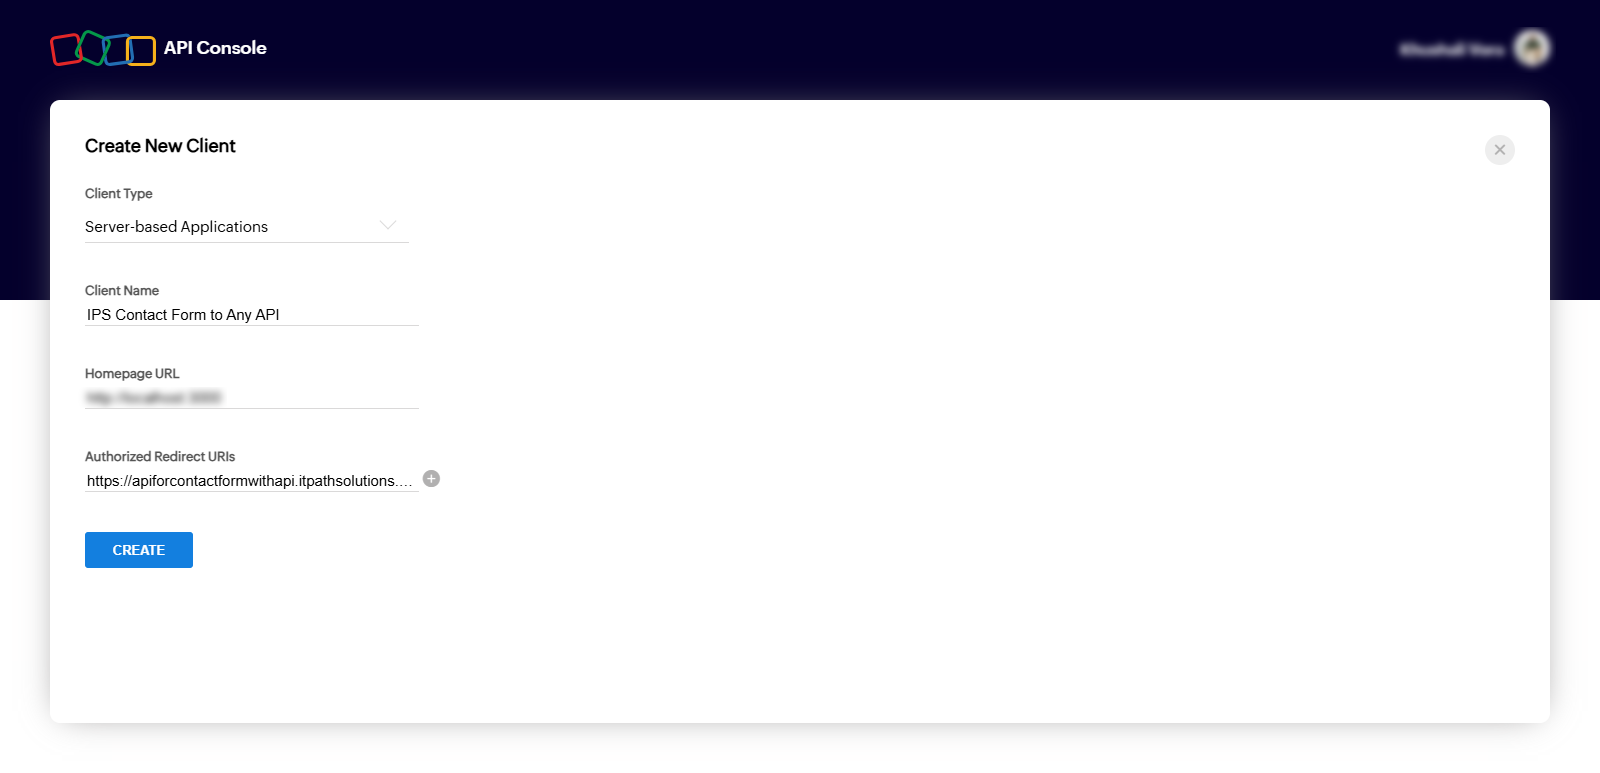
If you’ve worked with Zoho’s older documentation before, you may recognize this client type under a different name. Zoho used to call it “Web-based.” The current interface calls it Server-based Applications, but it’s the same application type, built for apps that handle authorization through a backend server, which is exactly what this integration needs.
Step 3: Enter the Zoho Application Details
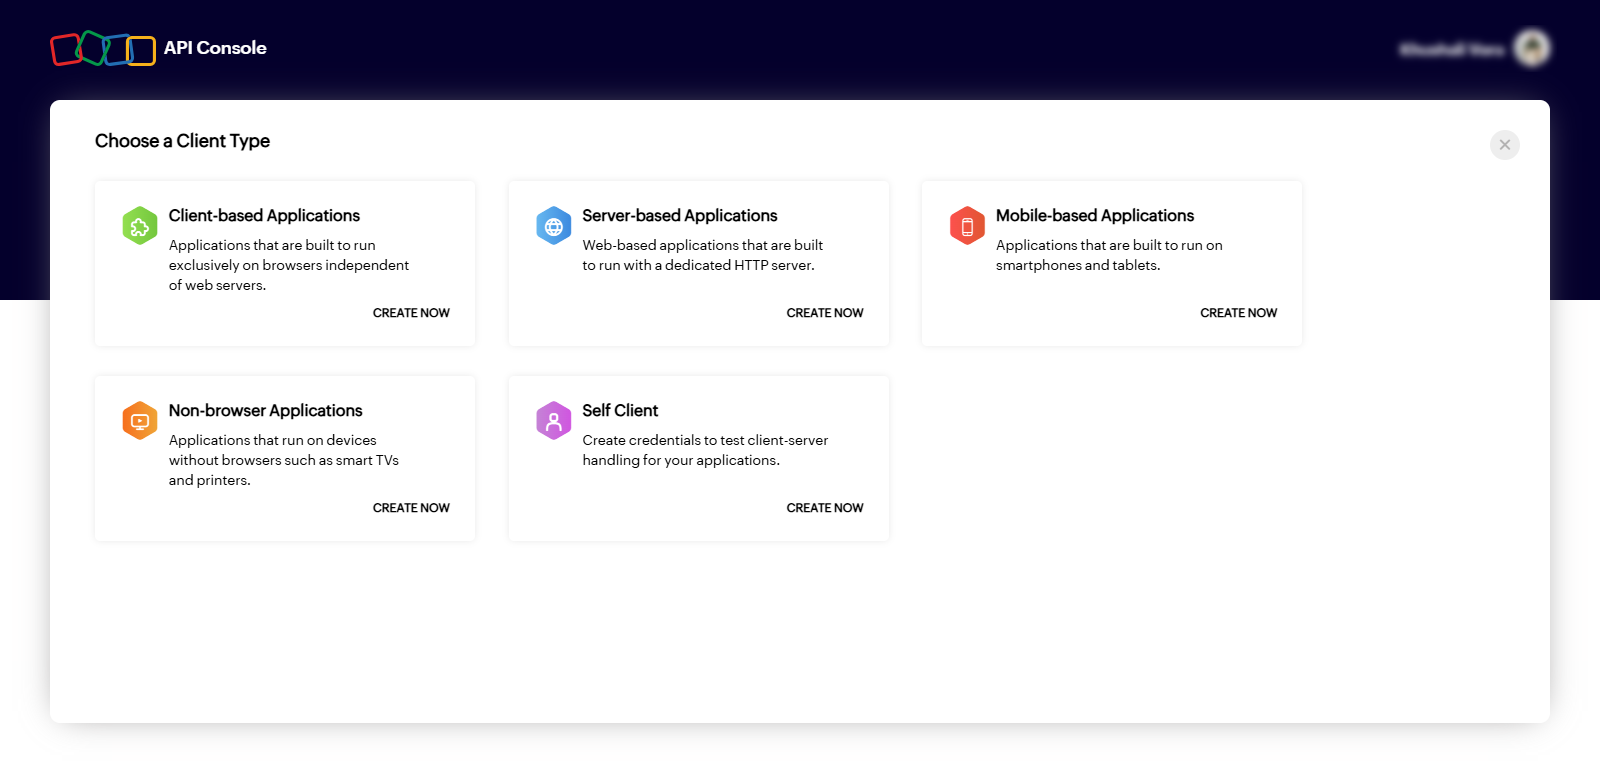
Zoho asks for a few pieces of information here.
- Client Name – Use something you’ll recognize later, for example
IPS Contact Form to Any API. - Homepage URL – Enter your store’s website address.
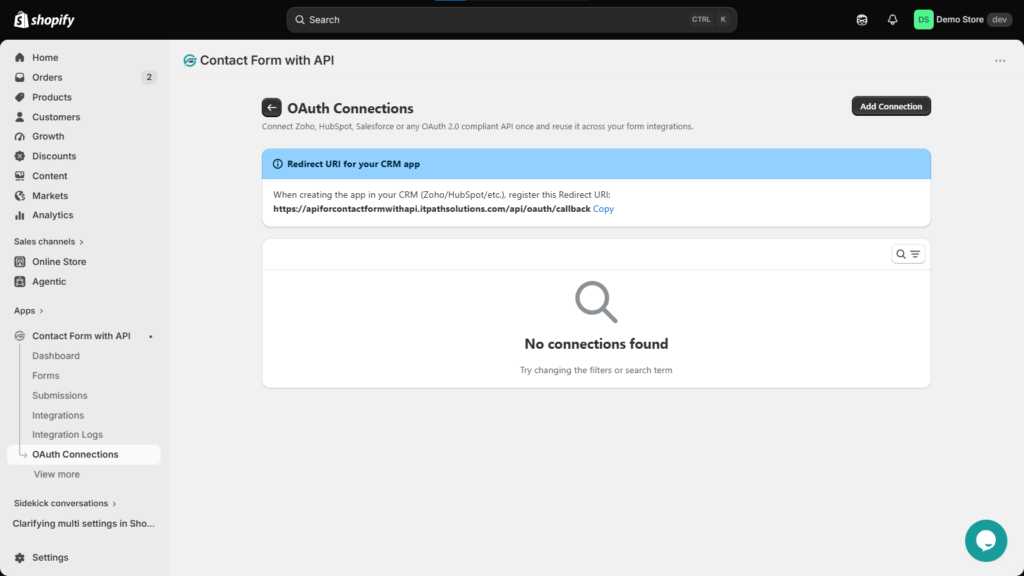
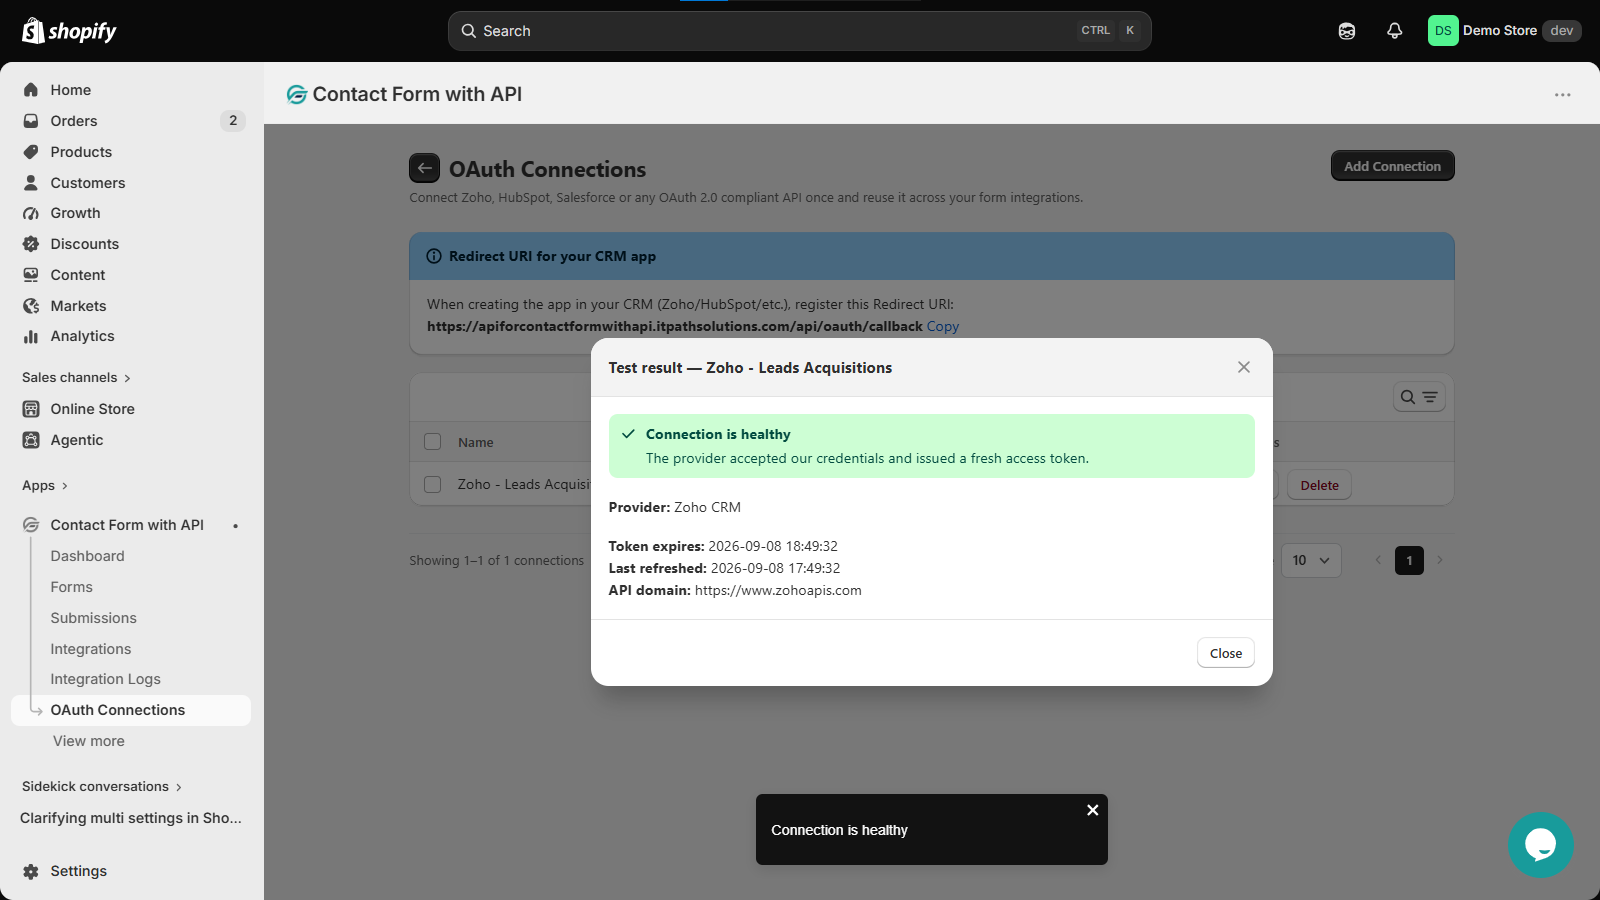
- Authorized Redirect URI – This one matters more than the others. Don’t type it from memory. Open OAuth Connections in your Shopify app first, where the exact redirect URI is displayed at the top of the page:
<https://apiforcontactformwithapi.itpathsolutions.com/api/oauth/callback>
Copy it exactly as shown and paste it into the Authorized Redirect URI field in Zoho. This URI has to match precisely what Zoho sends back during authorization. If it’s off by even a character, missing trailing slash included, Zoho will reject the connection with an invalid_redirect_uri error later on.
Step 4: Create the Zoho Application and Get Your Credentials
Click Create.
Zoho generates the application and hands you a Client ID and a Client Secret, both visible under the application’s Client Secret tab.
You’ll enter both of these into IPS – Contact Form with API in the next section.
Keep the Client Secret private. Don’t paste it into a shared document or send it over chat. Treat it the way you’d treat a password.
Part 2: Create the OAuth Connection in IPS – Contact Form to Any API
Step 5: Open OAuth Connections in Shopify
In your Shopify admin, go to:
Apps → IPS – Contact Form to Any API → OAuth Connections
This is where you’ll store the Zoho credentials and manage the authorization status of the connection. Once it’s set up here, you won’t need to touch the Zoho API Console again for this connection.
Step 6: Click Add Connection
Click Add Connection. A window opens where you’ll enter the connection details.
Step 7: Enter the Zoho OAuth Connection Details
Fill in the fields as follows:
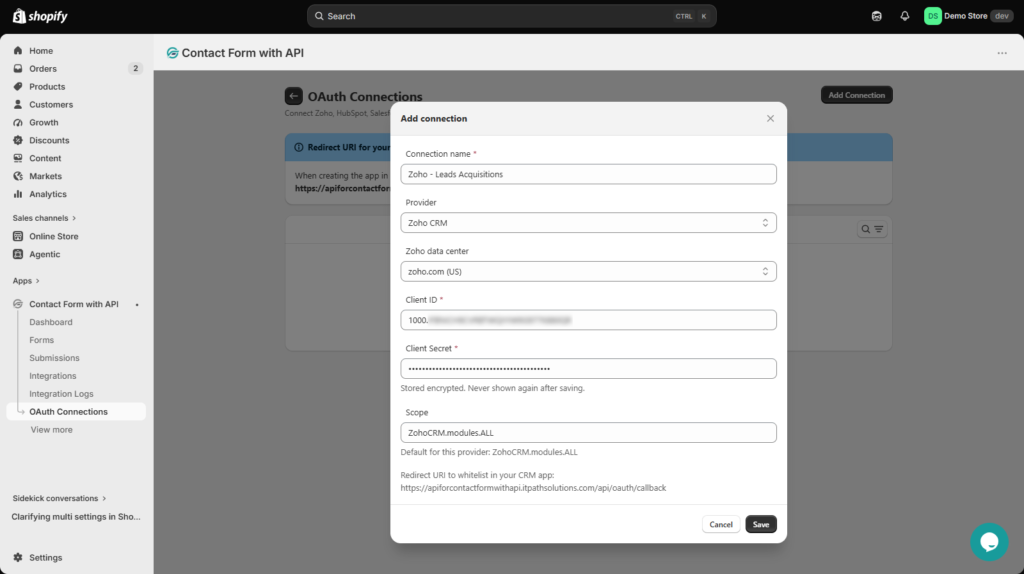
| Field | What to enter |
|---|---|
| Connection name | A name you’ll recognize later, for example Zoho - Leads Acquisitions |
| Provider | Zoho CRM |
| Zoho data center | The data center tied to your Zoho account |
| Client ID | The Client ID from the Zoho API Console |
| Client Secret | The Client Secret from the Zoho API Console |
| Scope | ZohoCRM.modules.ALL |
A couple of these need more than a one-line explanation.
Zoho data center needs to match where your Zoho account actually lives. Zoho hosts accounts across several regional domains: .com for the US, .eu for Europe, .in for India, and others. The documented example uses zoho.com (US), but that’s only correct if your account is on the US data center. Check your account’s region before selecting this, since picking the wrong one causes the authorization step to fail.
Client Secret won’t be shown again once you save. The app stores it securely, so if you lose track of it, you’d need to generate a new one from Zoho.
Scope controls what the connection can access in Zoho CRM. ZohoCRM.modules.ALL is the scope used in the documented setup and covers access across CRM modules.
Step 8: Check the Zoho Data Center Setting
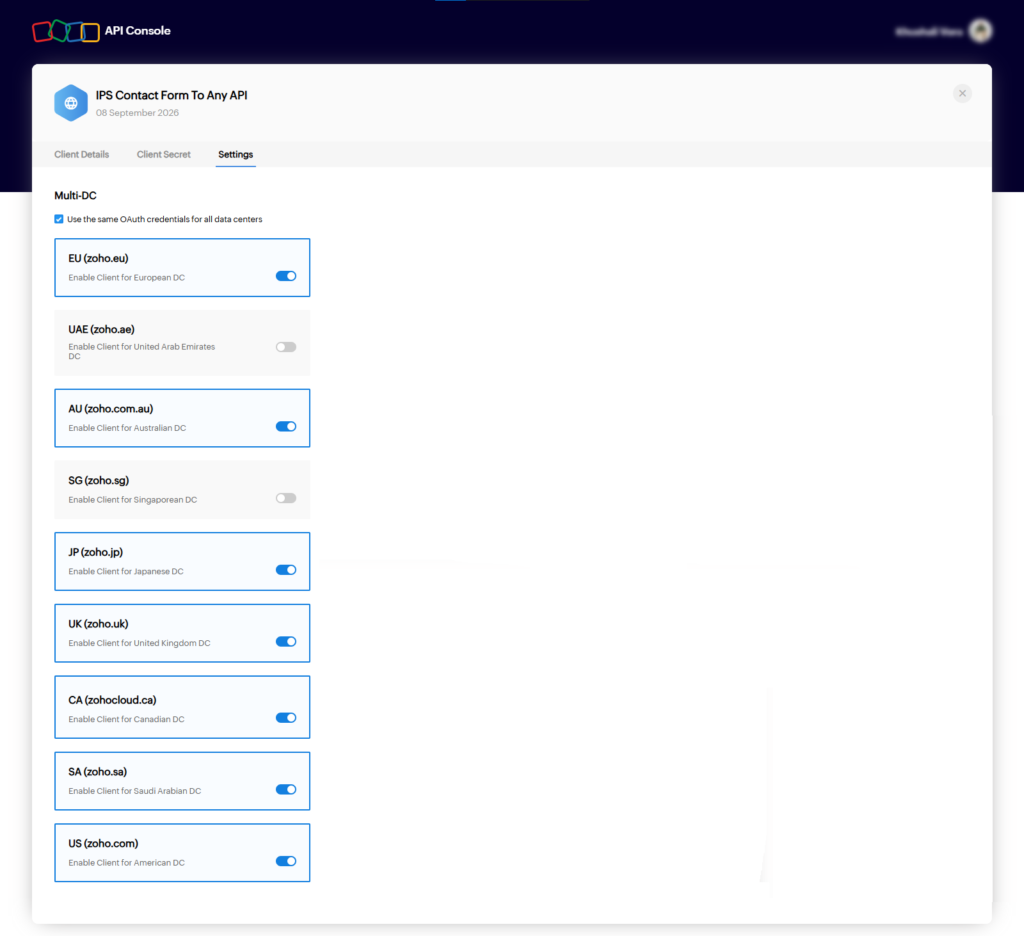
Before saving, check the box labeled Use the same OAuth credentials for all data centers, and double check that the data center you selected matches your actual Zoho account. This is the setting most likely to trip people up, so it’s worth a second look here rather than discovering the mismatch during authorization.
Step 9: Save the OAuth Connection
Click Save. The connection now appears on your OAuth Connections dashboard.
One thing to keep in mind: saving the connection stores the configuration, but it doesn’t authorize it yet. That’s a separate step, covered next.
Part 3: Authorize and Test the Zoho Connection
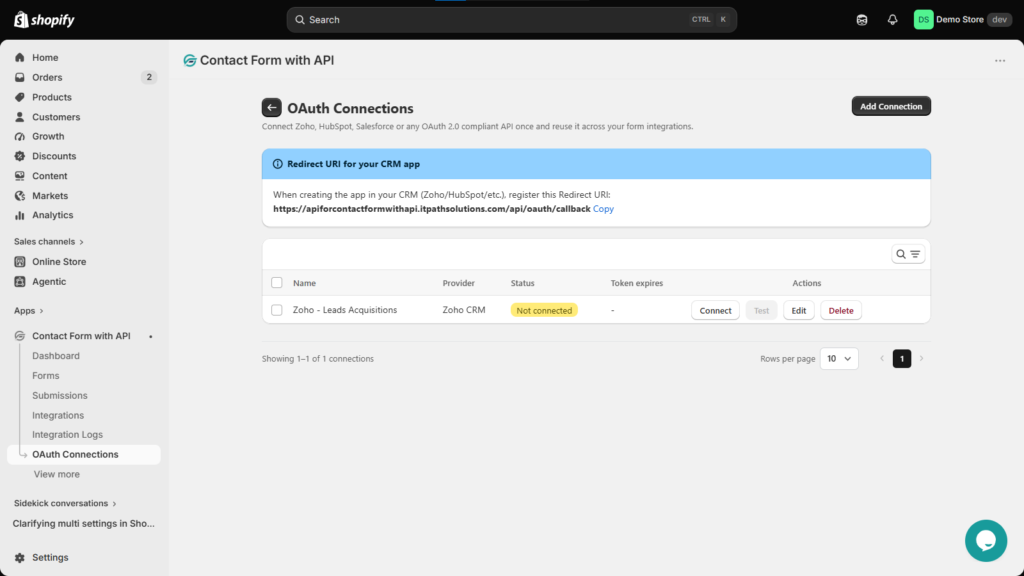
Step 10: Connect the OAuth Connection
Find the Zoho connection you just created on the OAuth Connections dashboard and click Connect. This starts the OAuth authorization process with Zoho.
Step 11: Authorize the Connection in Zoho
You’ll be taken through Zoho’s authorization screen. Sign in if prompted, and allow the permissions the connection requests.
Once you approve, Zoho sends you back to IPS – Contact Form to Any API using the redirect URI you set up earlier.
Step 12: Test the OAuth Connection
Back on the OAuth Connections dashboard, use the Test option next to the Zoho connection. This confirms the authentication actually works before you build an integration around it. If the test fails, it’s easier to fix the connection now than to troubleshoot a broken integration later.
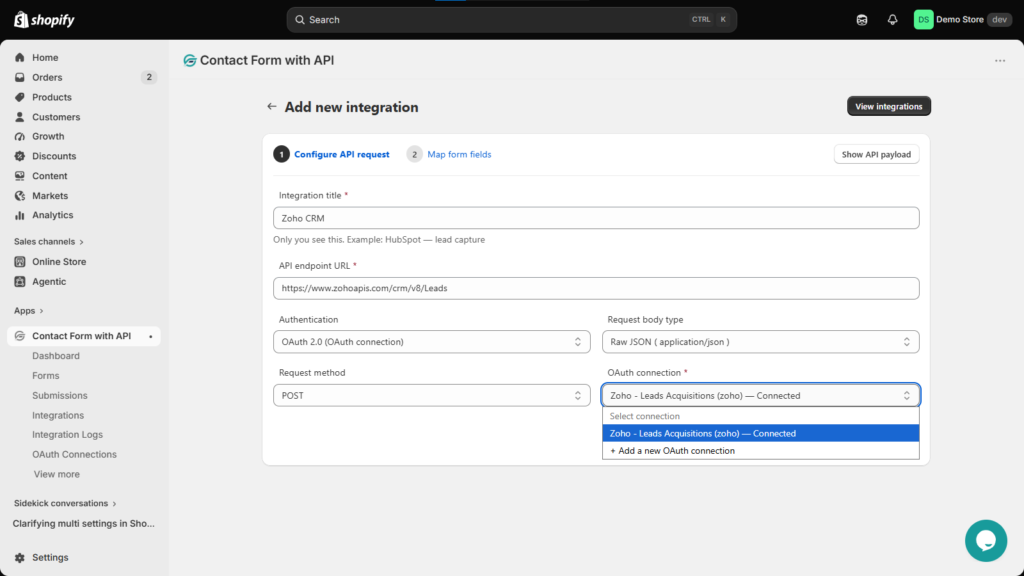
Go to Integrations under IPS – Contact Form with API, then click Add New Integration.
This opens the integration configuration screen.
Step 14: Select OAuth 2.0 as the Authentication Method
This tells the app to authenticate the request using the OAuth connection you already set up, rather than a manually entered API key or header. You will not need to re-enter the Zoho Client ID or Client Secret anywhere in this screen. The saved connection already handles that.
Step 15: Configure the Request Settings
For this setup, the default values work as-is:
- Request body type: Raw JSON (
application/json) - Request method: POST
These are the documented defaults for a Zoho OAuth 2.0 integration. If a specific Zoho API operation you’re using calls for something different, you can change either setting, but most Zoho CRM record operations work fine with these.
Step 16: Select the Zoho OAuth Connection
Open the OAuth connection dropdown and select the connection you created earlier, for example Zoho - Leads Acquisitions. Again, no need to enter the Client ID or Client Secret here. That’s already handled by the connection.
Part 5: Configure the Zoho API Request and Form Mapping
Step 17: Enter the API Endpoint
The API endpoint URL is the address that receives the form submission on Zoho’s side.
Zoho CRM has different endpoints depending on what operation you’re performing, creating a lead, updating a contact, adding a deal, and so on. There isn’t one single endpoint for “Zoho CRM.”
You’ll need to enter the endpoint that matches the specific Zoho CRM operation you want this integration to perform, based on Zoho’s own API reference for that module. Whatever endpoint you use, paste it into this field exactly as Zoho documents it.
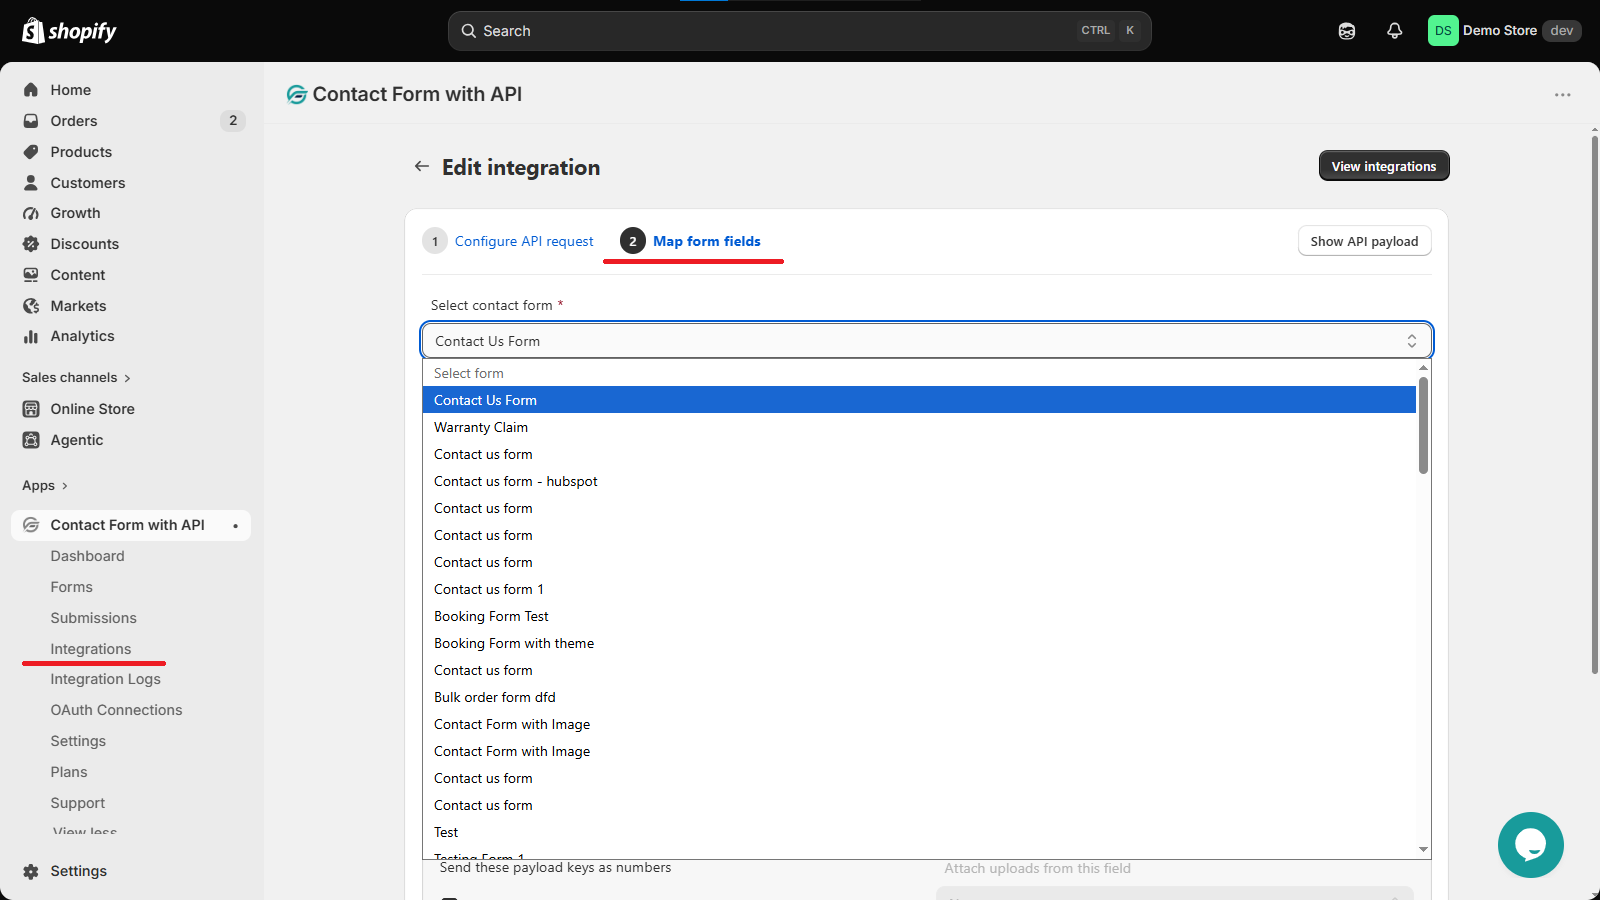
Step 18: Select the Shopify Contact Form
Click Next and you’ll land on the Map form fields screen.
From the Select contact form dropdown, choose the form whose submissions should go to Zoho CRM.
Step 19: Build the JSON Payload
The JSON payload decides what data gets sent to Zoho and how it’s labeled when it gets there.
The exact structure depends entirely on the Zoho CRM operation you’re using. A lead-creation request expects different fields than a deal-update request, so check what your specific Zoho endpoint expects, using Beautify JSON to keep it readable and Add sample JSON for a starting template.
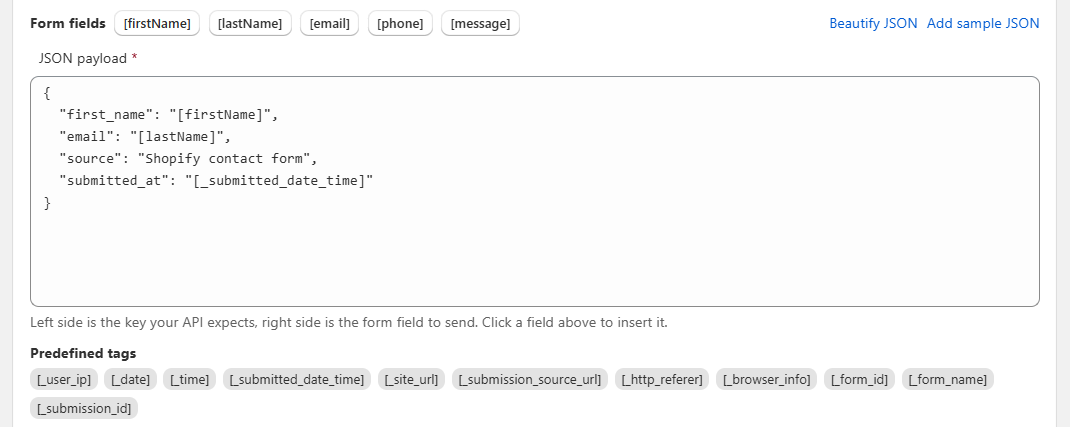
The core idea: the key on the left of each entry is the field name Zoho expects, and the value on the right is the Shopify form field or predefined tag whose data gets sent there.
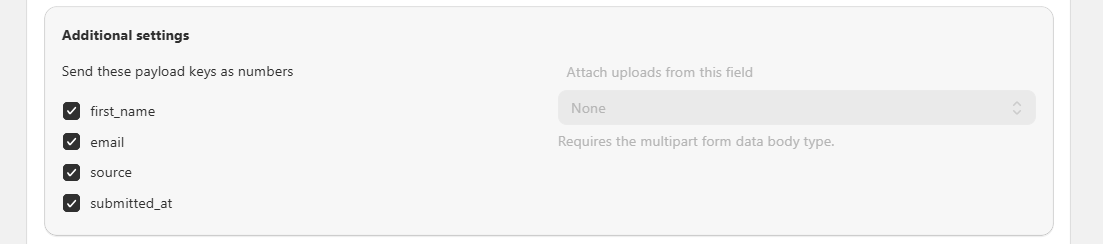
- Sending selected payload keys as numbers, instead of text
- Attaching an uploaded file to a specific form field
- Sending the request only when a condition is met
None of these are required. Leave them as-is unless your specific Zoho setup needs one of them.
Step 21: Add Conditions to Control When Data Is Sent
If you only want certain submissions forwarded to Zoho, enable Only send when a condition is met and configure:
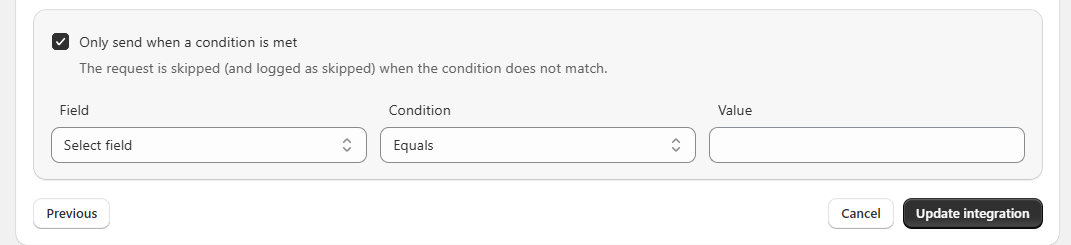
- Field – the form field to check
- Condition –
Equals,Does not equal,Contains,Does not contain,Is empty, orIs not empty - Value – what the field is compared against
For example:
| — | — | — |
With this in place, only submissions with a matching email domain get sent to Zoho. Everything else is skipped, and still shows up in Integration Logs, marked as skipped rather than sent. If you want every submission forwarded, leave this option disabled.
Step 22: Review and Save the Integration
Before saving, run through what you’ve configured:
- Integration title
- API endpoint URL
- Authentication method
- Request body type
- JSON payload
- Additional settings
- Conditions, if enabled
Once it checks out, click Save Integration.
Part 6: Test the Shopify Zoho CRM Integration
Step 23: Submit a Test Form
With the integration saved, submit the connected Shopify form using test information. This gives you a real submission to check against in the logs, so you can confirm the request fired instead of assuming Zoho received it.
Part 7: Verify Everything Using Integration Logs
Step 24: Open Integration Logs
In your Shopify admin, go to:
Shopify Admin → IPS – Contact Form to Any API → Integration Logs
This dashboard shows what happened after your test submission was processed.
Step 25: Understand What the Integration Log Shows
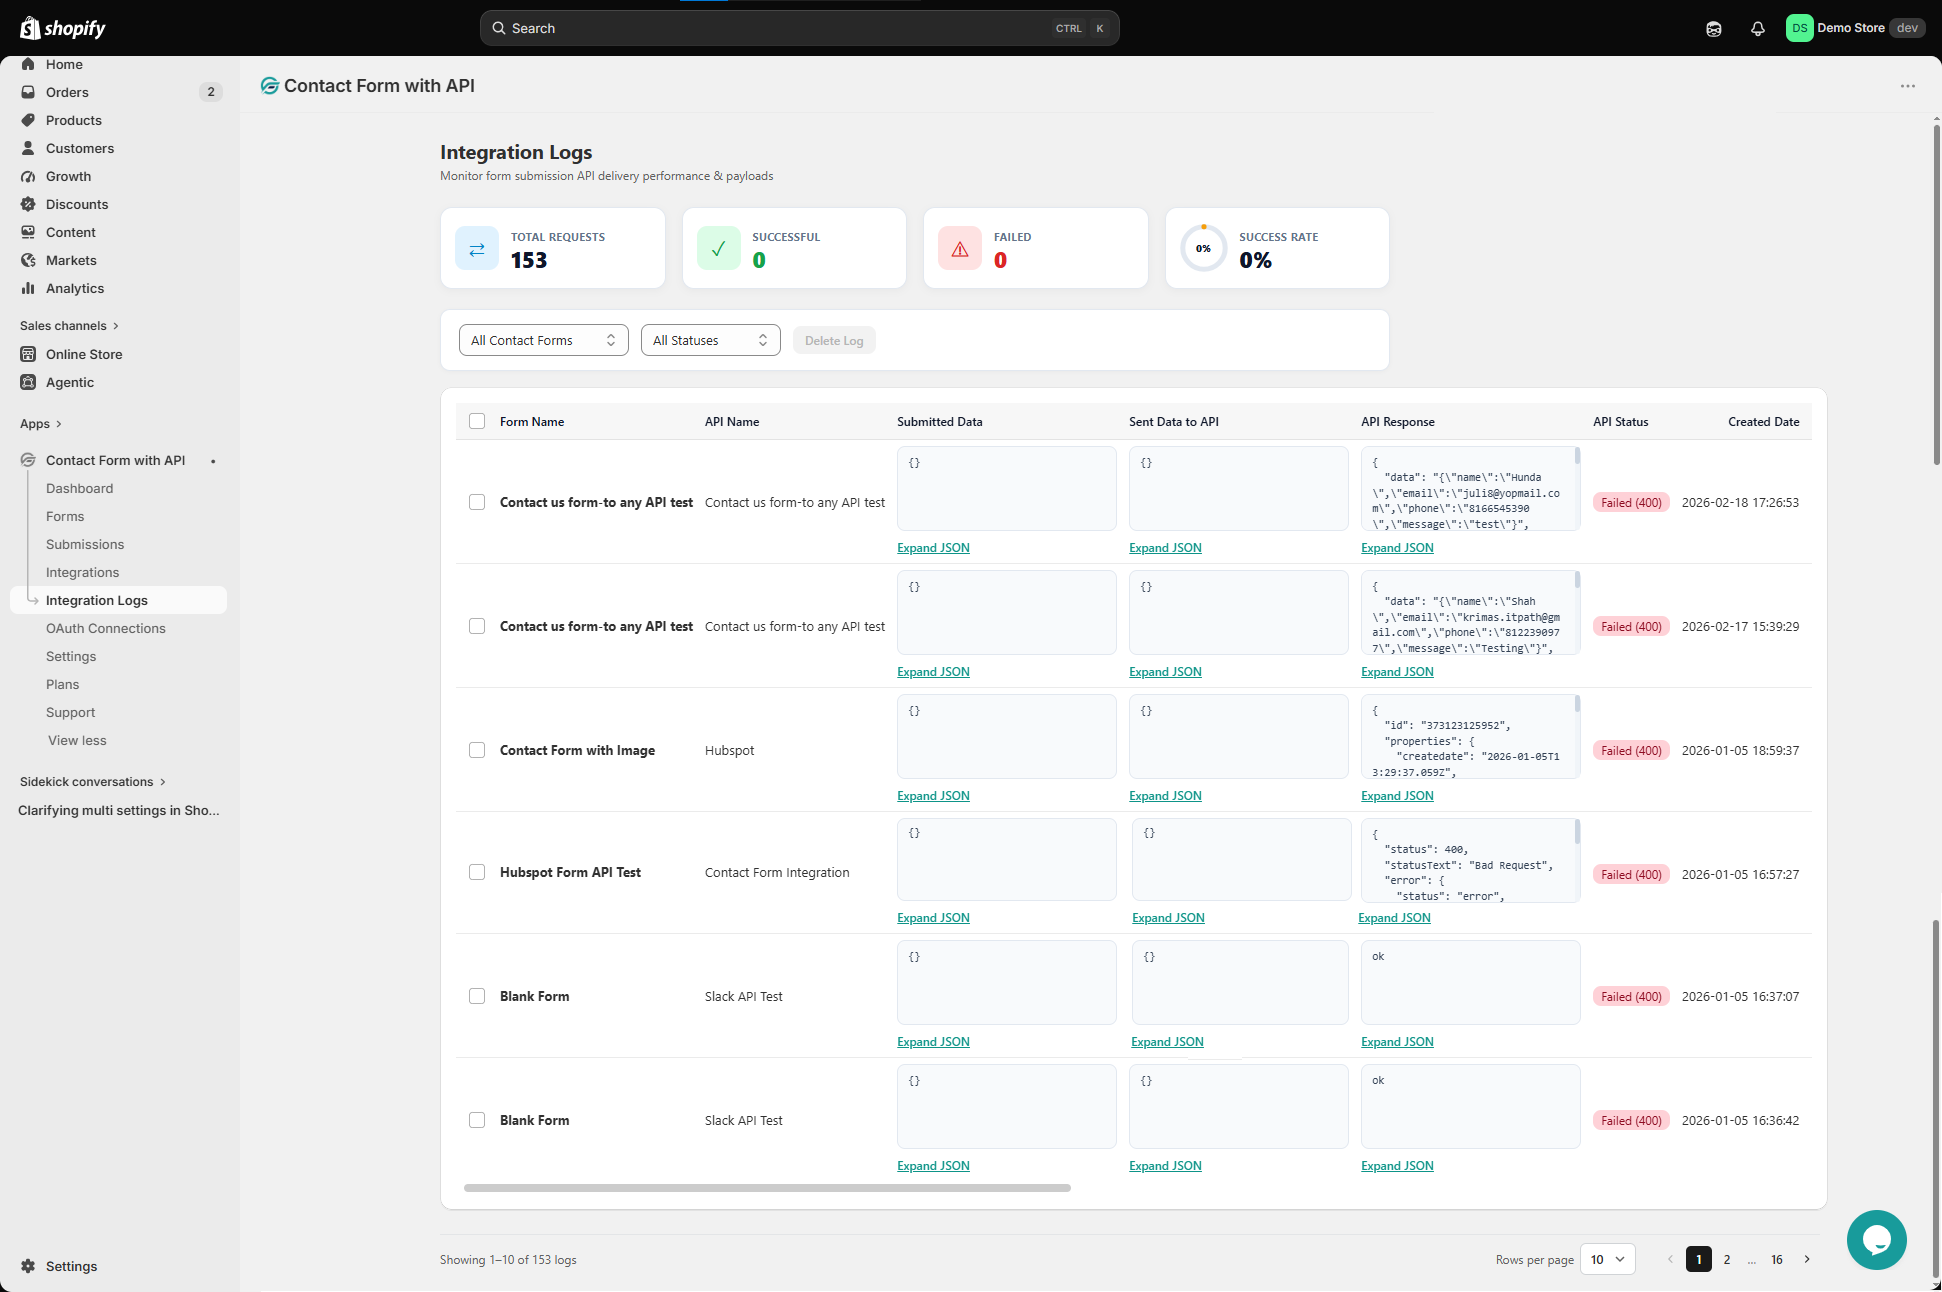
- API Name – which integration handled it
- Submitted Data – what was entered into the form
- Sent Data to API – what was actually sent to Zoho
- API Response – what Zoho sent back
- API Status – whether the request succeeded or failed, sometimes with an HTTP status code
- Created Date – when the log was recorded
Click Expand JSON under any of the data sections to see the full JSON instead of the shortened preview.
Step 26: Use Integration Logs to Troubleshoot Failed Requests
When something doesn’t look right, work through the log in order:
- If Submitted Data looks wrong, the issue is in the form itself or how a field was set up.
- If Submitted Data is correct but Sent Data to API isn’t, the JSON mapping in the integration needs a fix.
- If the failure points to authentication, go back to OAuth Connections and run Test on the Zoho connection again.
This sequence tells you exactly where in the chain things broke, instead of guessing.
Common Setup Mistakes to Avoid
- Selecting the wrong Zoho data center during setup
- Typing the redirect URI by hand instead of copying it from OAuth Connections
- Saving the OAuth connection but forgetting to click Connect and authorize it
- Skipping the Test step on the OAuth connection before building the integration
- Selecting the wrong Shopify contact form during mapping
- Mismatched JSON keys that don’t match what the Zoho endpoint expects
- Turning on the condition option without realizing it will skip submissions that don’t match
- Trying to re-enter the Zoho Client ID and Client Secret at the integration stage, when they’re already handled by the OAuth connection
Getting a Shopify Zoho CRM integration working comes down to a fairly linear path: create the Zoho OAuth application, build the OAuth connection in IPS – Contact Form with API, authorize it, test it, then create the API integration that uses it, map your form, and confirm everything through a test submission and its log entry.
The part worth remembering is that the OAuth connection is reusable. Once it’s authorized, you can build additional integrations against the same Zoho account without touching the Client ID or Client Secret again. That’s the main advantage over managing raw API keys by hand.
From here, if you need to sync Shopify forms with Zoho CRM across multiple forms or Zoho modules, the same OAuth connection can support each new integration. Just repeat Part 4 onward for each one, pointing it at the right endpoint and payload for that Zoho operation.