


SMTP Settings
SMTP settings allow you to connect your own email account to IPS – Contact Form to Any API so the app can use that account to send emails.
If you are not familiar with SMTP, don’t worry. You can think of SMTP as the delivery system that helps an email travel from your server to the recipient’s inbox.
For example, when a form on your Shopify store needs to send an email, SMTP tells the app which email account to use and how to connect to that email provider securely.
What is SMTP?
SMTP stands for Simple Mail Transfer Protocol. It is the standard protocol used to send emails from one email server to another.
You can think of it like a postal service:
- Your email account is the sender.
- The SMTP server is the mail service that sends the message.
- The recipient’s email server receives the message and delivers it to their inbox.
In IPS – Contact Form to Any API, SMTP settings let you tell the app which email account and email service it should use when sending emails.
Why do I need SMTP settings?
If you want emails generated by your forms to be sent through a specific email account, you can configure that email account as an SMTP account in the app.
This is especially useful when you want to:
- Send emails using your own Gmail or other email account.
- Use different email accounts for different purposes.
- Choose a primary/default email account for your store.
- Maintain multiple SMTP accounts and switch between them when needed.
Access SMTP Settings
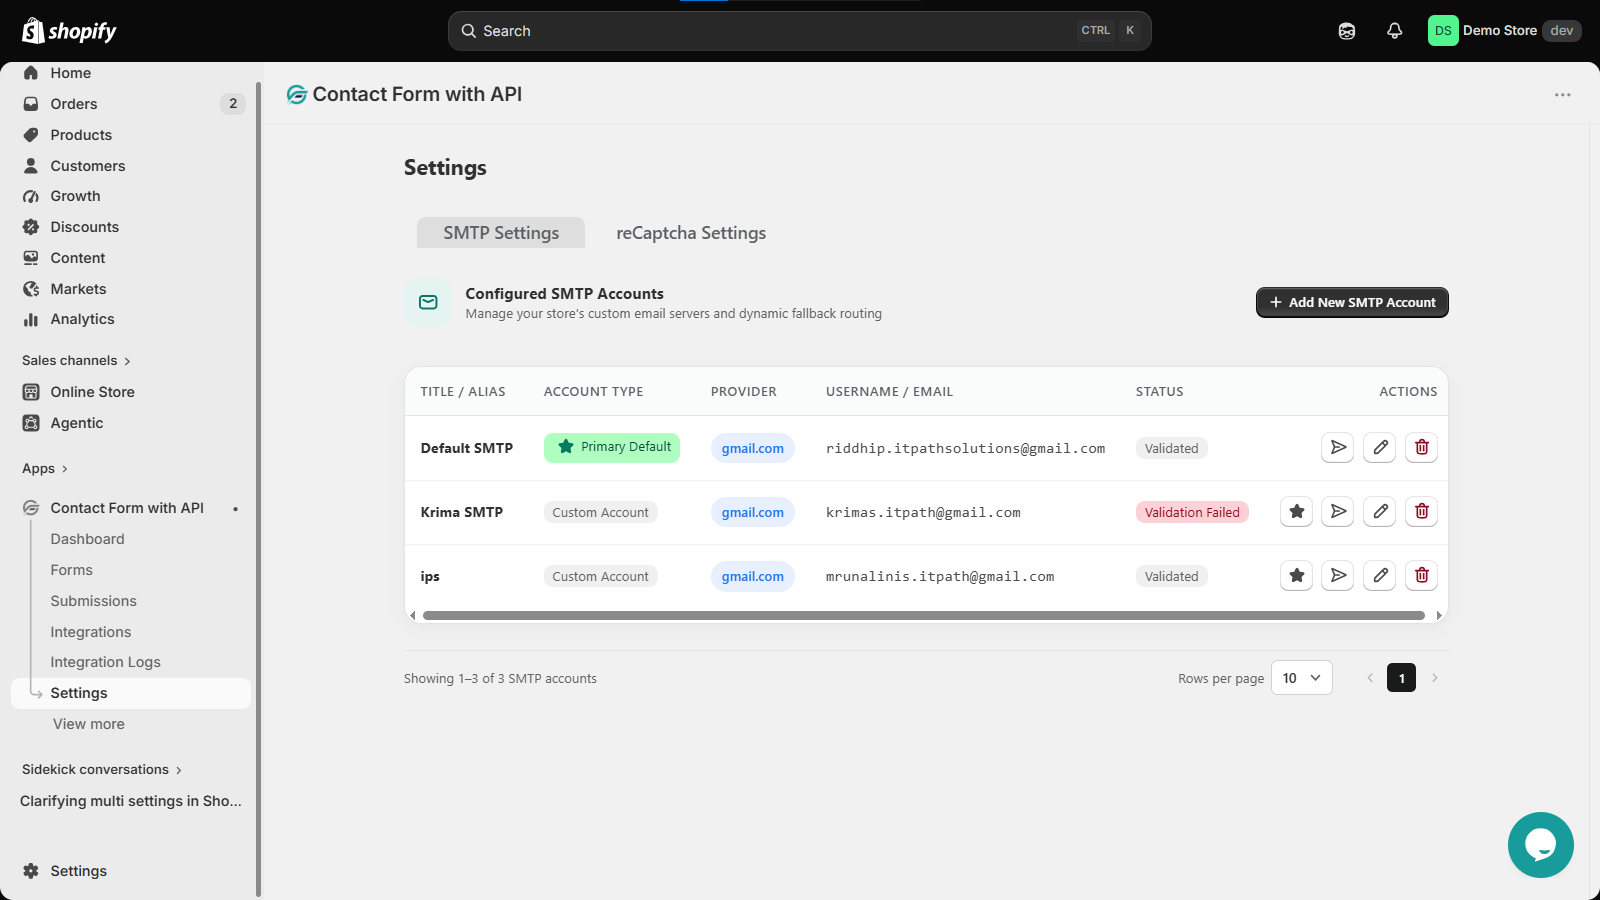
To configure SMTP:
- Open Shopify Admin.
- Go to Apps.
- Open Contact Form with API.
- Go to Settings.
- Open the SMTP Settings tab.
Here you can view your existing SMTP accounts and add new ones.
You may already see one or more SMTP accounts listed on this page.
Add a New SMTP Account
To add an SMTP account, click + Add New SMTP Account.
A window will open with the SMTP configuration fields.
You need to enter the required information before saving the account.
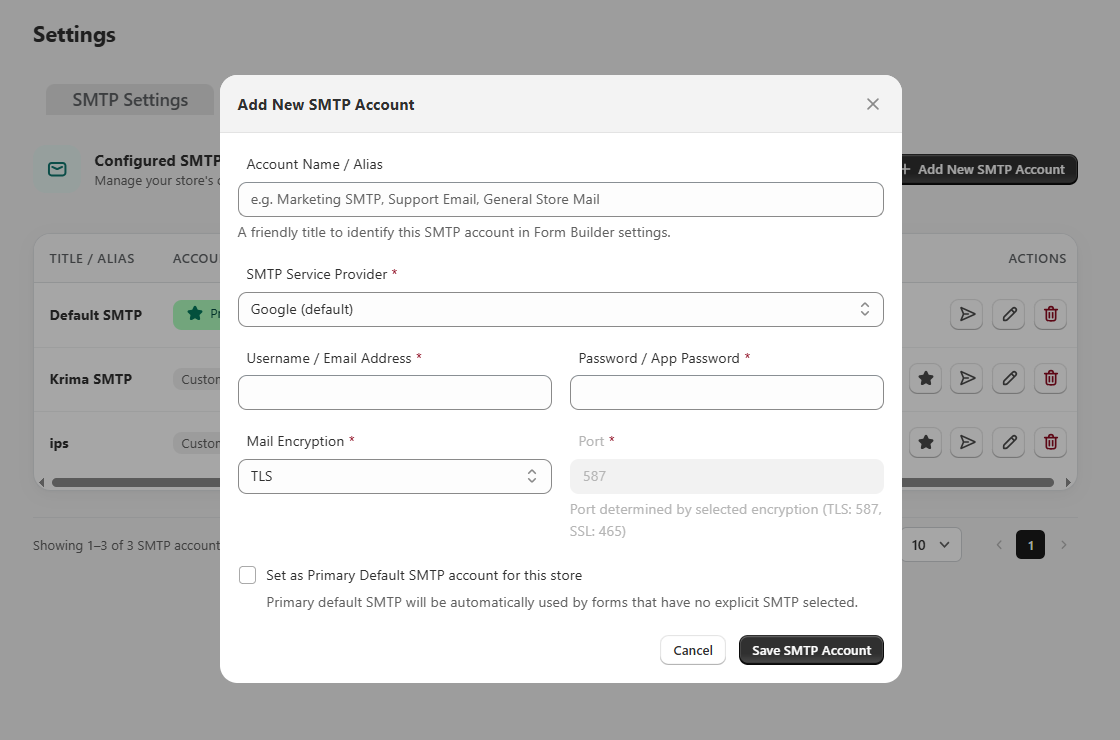
1. Account Name / Alias
Enter a name that helps you identify this SMTP account inside the app.
For example:
- Marketing SMTP
- Support Email
- General Store Mail
- Customer Support
- Orders Email
This name is only used to identify the SMTP account in the app. It does not change your actual email address.
Example: Support Email
Why is this useful?
If you have multiple SMTP accounts, meaningful names make it easier to know which account you are using.
For example, instead of seeing several accounts with similar email addresses, you can quickly identify:
- Marketing SMTP
- Support SMTP
- Orders SMTP
2. SMTP Service Provider
Select the email service provider you want to use.
In the current interface, Google (default) is available as a provider.
Your selected provider determines how the app connects to the email service.
Example
If you are connecting a Gmail account, select:
Google (default)
Select the appropriate provider available for the email account you are connecting.
3. Username / Email Address
Enter the email address of the account you want the app to use for sending emails.
Example
[email protected]
Use the full email address rather than only the username.
Make sure the email address belongs to the SMTP account you are configuring.
4. Password / App Password
Enter the password required by your email provider to authenticate the SMTP connection.
For some providers, this may be an App Password rather than your normal account password.
1. For Google/Gmail accounts
Google supports App Passwords for accounts that have 2-Step Verification enabled.
An App Password is a separate 16-digit passcode that can be used by an app or device when the normal Google sign-in method is not available.
So, when connecting a Gmail account, do not automatically assume that your regular Gmail password should be entered here.
If Google requires an App Password, create one in your Google Account and enter that generated password in this field.
Important: Treat your SMTP password or App Password like a password. Do not share it with anyone or publish it in screenshots or documentation.
Google also notes that App Passwords are revoked after you change your Google Account password, so you may need to generate a new one afterward.
2. For Gmail
Before creating an App Password, make sure 2-Step Verification is enabled on your Google Account.
5. Mail Encryption
Select the security method that should be used when the app connects to your email provider.
In the current interface, you can choose:
- TLS
- SSL
Encryption helps protect the connection between the app and your email provider.
1. TLS
TLS is the selected option by default in the shown interface.
With TLS selected, the app uses:
Port 587
2. SSL
When SSL is selected, the app uses:
Port 465
The port is determined automatically based on the selected encryption method, so you normally do not need to enter it manually.
Your screen also displays the corresponding port information below the field.
6. Port
The Port is the communication channel the app uses to connect to the SMTP server.
You do not normally need to enter the port yourself because the app determines it from the selected encryption type.
In the current interface:
| Encryption | Port |
|---|---|
| TLS | 587 |
| SSL | 465 |
For example, if you select TLS, the port is automatically set to 587.
7. Set as Primary Default SMTP Account
The Set as Primary Default SMTP account for this store option lets you choose which SMTP account should be used as the store’s default.
Enable this checkbox when you want this account to become the primary SMTP account.
The interface explains that the primary default SMTP account will automatically be used by forms that do not have an SMTP account explicitly selected.
Example
Suppose you have three SMTP accounts:
- Support Email
- Marketing Email
- Orders Email
You select Support Email as the Primary Default SMTP account.
Any form that does not have its own SMTP account selected can then use the Support Email account as the default.
Important
You can have multiple SMTP accounts configured, but only one account should be treated as the primary default for the store at a time.
Save the SMTP Account
After entering all the required details:
- Enter the Account Name / Alias.
- Select the SMTP Service Provider.
- Enter the Username / Email Address.
- Enter the Password / App Password.
- Select the required Mail Encryption.
- Check Set as Primary Default SMTP account for this store if you want this account to be the default.
- Click Save SMTP Account.
The app will validate the SMTP details.
Understanding SMTP Account Status
After adding an account, you can see its status in the SMTP accounts table.
The status helps you quickly understand whether the SMTP account is working correctly.
1. Validated
Validated means the SMTP account has been successfully verified by the app.
The connection details and authentication were accepted, so the account is ready to be used.
2. Validation Failed
Validation Failed means the app could not successfully verify the SMTP account.
This can happen when details such as the following are incorrect:
- Email address
- Password or App Password
- Encryption type
- SMTP configuration
- Provider authentication requirements
For Gmail, an incorrect password/App Password is a common reason for authentication failures. Google documents SMTP authentication errors such as “Username and Password not accepted” and “Application-specific password required.”
Check the account details and update the configuration before trying again.
Manage Existing SMTP Accounts
After configuring SMTP accounts, you can manage them from the SMTP Settings page.
The account list displays:
| Column | What it shows |
|---|---|
| Title / Alias | The name you gave the SMTP account |
| Account Type | Whether the account is the Primary Default or a Custom Account |
| Provider | The selected email service provider |
| Username / Email | The email address connected to the account |
| Status | Whether the SMTP account has been successfully validated |
| Actions | Available actions for managing the account |
Make an SMTP Account the Primary Default
If an SMTP account is not currently the default, you can use the star icon in the Actions column to set it as the primary account.
Once selected as the primary default, it can be used automatically by forms that do not have a specific SMTP account selected.
Test an SMTP Account
Use the paper-plane action beside an SMTP account to test the configured SMTP connection.
Testing the account is useful after adding or updating SMTP details because it helps you confirm that the account is working before relying on it for your forms.
Edit an SMTP Account
Click the pencil icon to edit an existing SMTP account.
You can update the account details, such as the email address, password/App Password, provider, encryption, or other configuration fields.
After making changes, save the account so the updated details can be validated.
Delete an SMTP Account
Click the trash icon to remove an SMTP account from the app.
Before deleting an account, make sure it is not the SMTP account currently required by any of your forms.
If an account is being used as the primary/default SMTP account, consider selecting another account as the default before removing it.
Example: Configure a Gmail SMTP Account
Here is a simple example of what a Gmail configuration can look like.
| Setting | Example |
|---|---|
| Account Name / Alias | Support Email |
| SMTP Service Provider | |
| Username / Email Address | [email protected] |
| Password / App Password | Your Google App Password |
| Mail Encryption | TLS |
| Port | 587 |
| Primary Default | Enable if this should be your store’s default SMTP account |
For Gmail’s outgoing SMTP service, Google documents TLS/STARTTLS on port 587 and SSL on port 465.
What if SMTP validation fails?
If your SMTP account shows Validation Failed, check the following:
1. Check your email address
Make sure the username/email address is correct and belongs to the email account you are trying to connect.
2. Check your password or App Password
Make sure you have entered the correct password.
For Gmail, check whether you need to use an App Password instead of your normal Google password. Google requires 2-Step Verification to be enabled before an App Password can be created.
3. Check the encryption setting
Make sure the selected encryption method matches what your email provider requires.
For the configuration shown in the app:
- TLS → Port 587
- SSL → Port 465
4. Try validating again
After correcting the settings, save or test the account again and check whether its status changes to Validated.
Important Notes About SMTP
SMTP is used for sending email. It is not the same thing as your regular Gmail or email inbox.
Your SMTP credentials give the app permission to connect to the configured email service and send mail through that account.
You should also keep your SMTP credentials secure. Never share your password or App Password publicly.
For Gmail accounts, Google recommends using Sign in with Google when a service supports it. App Passwords are intended for situations where that sign-in method is not available.
Final Note
Once your SMTP account is successfully configured and shows Validated, it is ready to be used by the app for email delivery. Keeping a valid primary SMTP account configured also ensures that forms without their own SMTP selection have a default account available.