


Integration Logs
When a form is connected to an external API, it is important to know what happens after a customer submits the form. Did the app send the data to the API? What data was sent? How did the API respond? Was the request successful or did it fail?
The Integration Logs feature in IPS – Contact Form to Any API gives you a detailed view of your API requests and their results. From one dashboard, you can monitor API activity, review the data submitted through your forms, check the data sent to the API, view the API response, and identify successful or failed requests.
What are Integration Logs?
Every time a form submission is sent to an API through your integration, the app records the API request in Integration Logs.
These logs provide a complete view of the API delivery process, allowing you to see what happened to a submission after it was received by the form.
You can use Integration Logs to:
- Monitor the number of API requests made by your forms
- Check successful and failed API requests
- View your overall API success rate
- See which form and API were involved in a request
- Review the data submitted through the form
- Check the data that was sent to the API
- View the response returned by the API
- Check the API status of each request
- See when a particular log was created
- Troubleshoot API integration issues more easily
Accessing Integration Logs
To view your API integration activity:
- Open IPS – Contact Form to Any API from your Shopify store.
- From the app menu, select Integration Logs.
- The Integration Logs dashboard will open, where you can view your API request summary and individual log entries.
Overview of the Integration Logs Dashboard
At the top of the Integration Logs dashboard, you can see a quick summary of your API activity.
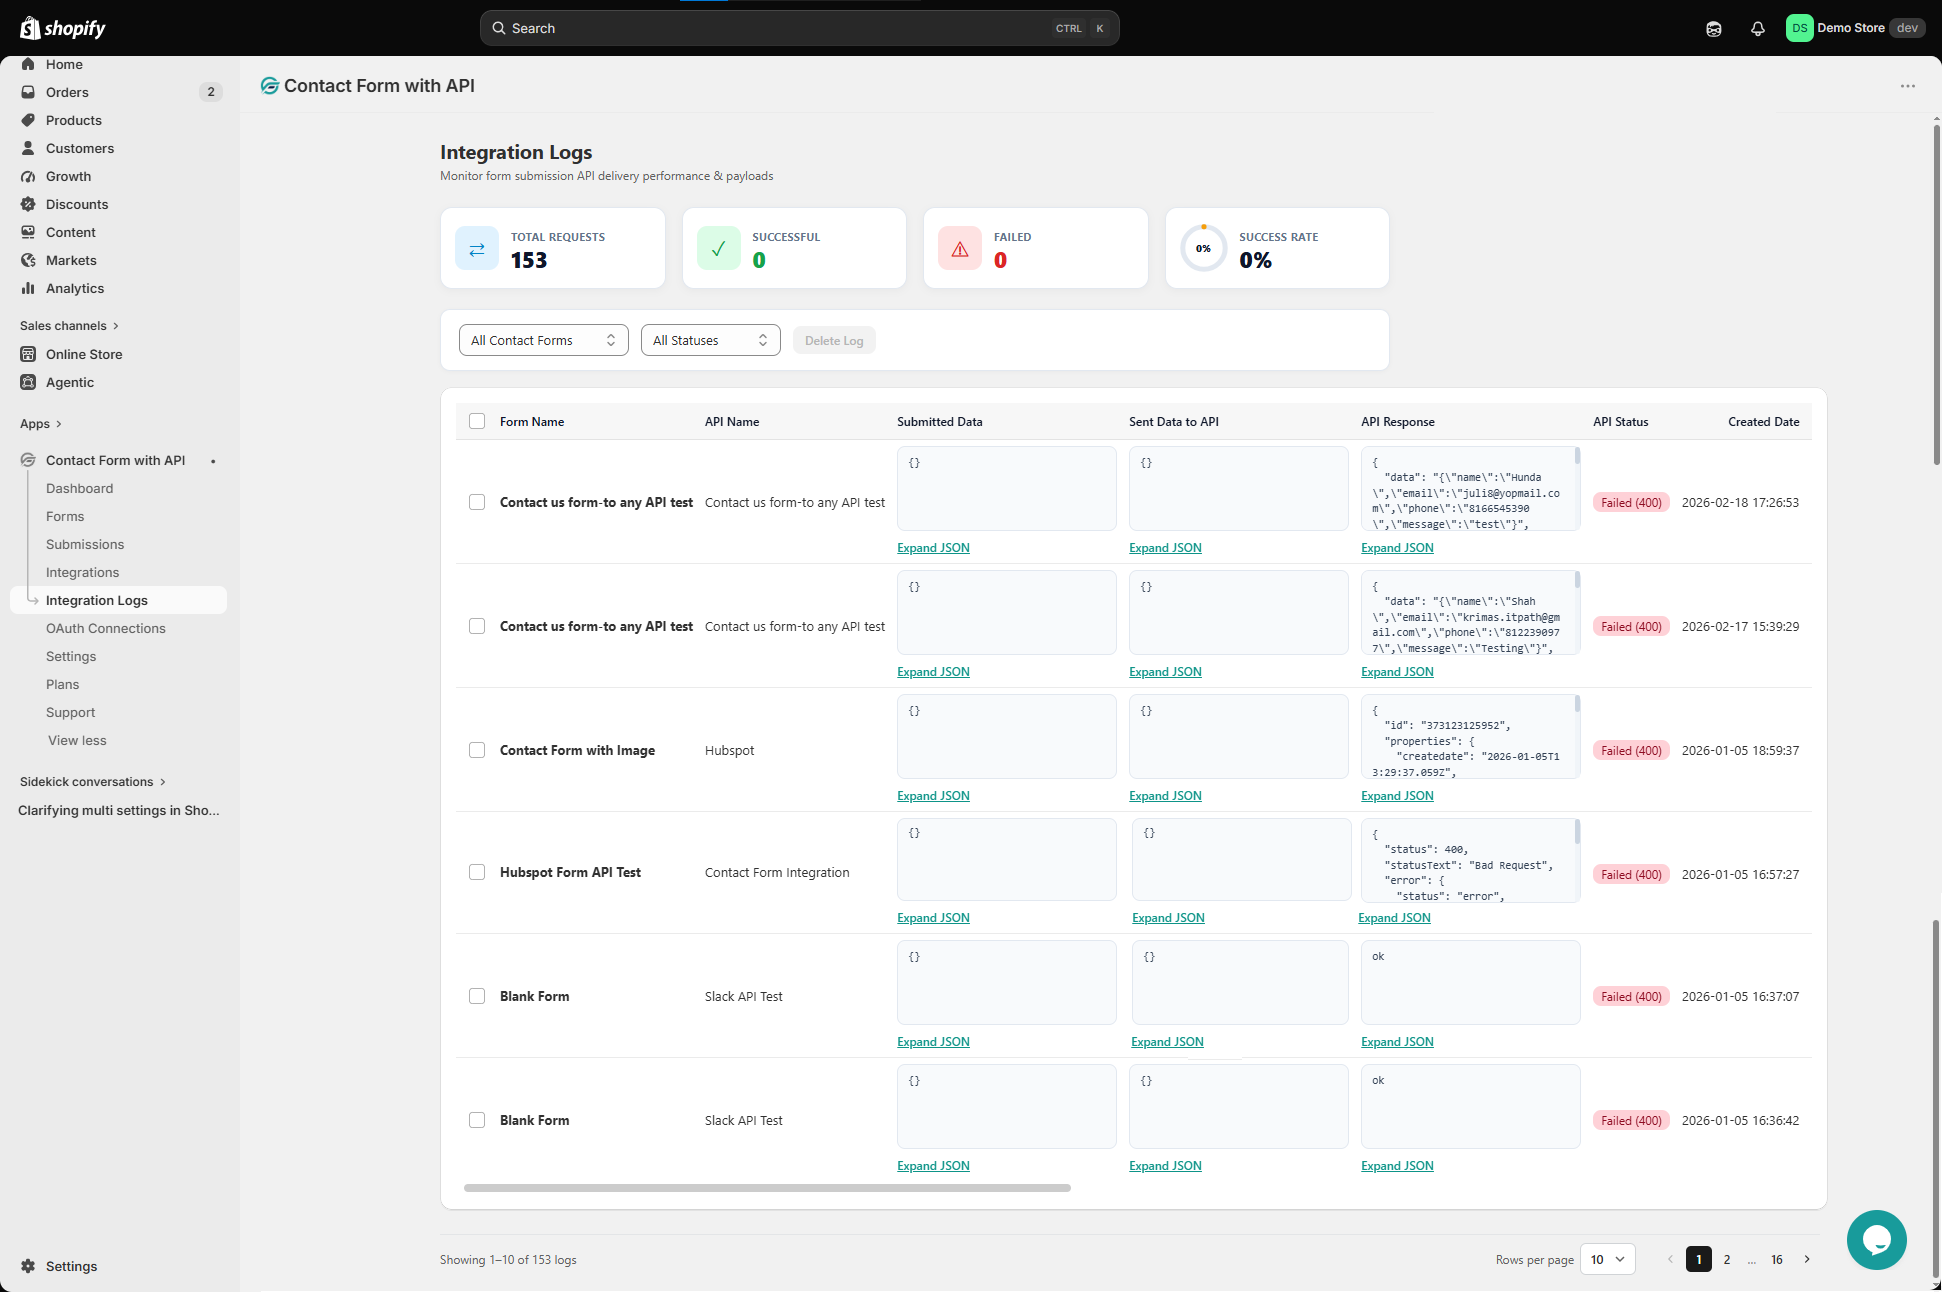
1. Total Requests
The Total Requests card shows the total number of API requests recorded in your integration logs.
This gives you a quick overview of how many requests have been made by your form integrations.
2. Successful
The Successful card shows the number of API requests that were completed successfully.
This helps you quickly determine how many requests were delivered successfully to the connected APIs.
3. Failed
The Failed card shows the number of API requests that were unsuccessful.
A failed request can indicate an issue with the API request, the data being sent, the integration configuration, or the response returned by the connected API.
4. Success Rate
The Success Rate card shows the percentage of API requests that were successful.
This gives you a quick understanding of the overall performance of your API integrations without having to manually check every individual log.
Filter Your Integration Logs
When you have a large number of logs, you can use the available filters to find the information you need more quickly.
1. Filter by Contact Form
The Contact Forms filter allows you to select a specific form and view the integration logs related to that form.
You can also leave it as All Contact Forms to view logs from all forms.
This is useful when your store has multiple forms connected to different APIs.
2. Filter by Status
The Status filter allows you to filter your logs based on their API status.
You can use it to narrow the list down and focus on requests with a particular result, such as successful or failed requests.
For example, when troubleshooting an integration, you can filter the logs to find failed requests instead of checking every log individually.
Information Available in Each Integration Log
Each log entry provides detailed information about the form submission and the API request.
The log table includes the following information:
1. Form Name
The Form Name shows which contact form generated the API request.
This makes it easy to identify the form associated with each log, especially when you have multiple forms in your Shopify store.
2. API Name
The API Name identifies the API integration used for that request.
This helps you understand which configured API connection received the form data.
For example, one form may be connected to HubSpot while another may use a different API integration. The API Name helps you identify the integration involved in each request.
3. Submitted Data
The Submitted Data section shows the data that was submitted through the form.
This allows you to check what information the customer entered when submitting the form.
The data is displayed in JSON format, and you can select Expand JSON to view the information in greater detail.
This can be useful when checking whether the expected form fields and values were submitted.
4. Sent Data to API
The Sent Data to API section shows the data that the app sent to the connected API.
This lets you compare the original form submission with the information that was actually sent to the external API.
The data is displayed in JSON format, and you can select Expand JSON to view the complete data.
This is particularly useful when troubleshooting an issue because you can verify exactly what information was included in the API request.
5. API Response
The API Response section displays the response from the connected API after the request is sent.
The response can help you understand how the external API handled the request.
For a successful request, the response can help confirm that the API processed the request. For a failed request, the response may provide useful information about what went wrong.
The response is displayed in JSON format, and you can select Expand JSON to view the complete response.
6. API Status
The API Status shows the result of the API request.
For example, a log may display a status such as Failed (400), as shown in the dashboard.
The status helps you quickly identify whether a request was successful or failed and, when an HTTP status code is available, provides additional information about the result of the API request.
You can use this column together with the API Response to investigate failed requests.
7. Created Date
The Created Date shows when the integration log was created.
This makes it easier to identify a specific API request based on when it occurred, especially when multiple submissions were made around the same time.
View Complete JSON Data
Some of the information displayed in Integration Logs can be lengthy, particularly the submitted data, sent data, and API response.
To view the complete JSON information, click Expand JSON below the relevant data section.
This allows you to inspect the complete information instead of relying only on the preview shown in the log table.
For troubleshooting, you can compare:
Submitted Data → Sent Data to API → API Response → API Status
This gives you a clearer picture of what happened during the API request.
Delete Integration Logs
The Integration Logs dashboard also provides a Delete Log option.
To delete logs:
- Select the log entries you want to remove using the checkboxes.
- Click Delete Log.
- The selected logs will be removed from the Integration Logs list.
The checkboxes allow you to select individual log entries before performing the delete action.
How to Use Integration Logs for Troubleshooting
Integration Logs are especially useful when an API integration does not appear to be working as expected.
For example, suppose a customer submits your contact form, but their information does not appear in the connected application.
- You can open Integration Logs and check the related entry.
- Start by checking the Submitted Data to confirm that the expected information was received from the form.
- Next, check Sent Data to API to see what information was actually sent to the external API.
- Then review the API Response and API Status to understand how the API handled the request.
This allows you to trace the request from the original form submission to the final API response instead of having to guess where the problem occurred.
Example
A customer submits a form containing their name, email address, phone number, and message.
You can use the Integration Log to check:
| Form Name | Which form was submitted |
|---|---|
| API Name | Which API integration handled the request |
| Submitted Data | What the customer entered in the form |
| Sent Data to API | What information was sent to the external API |
| API Response | What the API returned |
| API Status | Whether the request succeeded or failed |
| Created Date | When the request was logged |
If the API request failed, the API Status and API Response can provide important clues that can help you identify the issue.
Integration Logs at a Glance
The Integration Logs dashboard gives you both a quick overview and detailed information about individual API requests.
At the top, you can monitor:
| Total Requests | Total API requests recorded |
|---|---|
| Successful | Number of successful requests |
| Failed | Number of failed requests |
| Success Rate | Percentage of successful requests |
For each individual log, you can review:
| Form Name | The form that generated the request |
|---|---|
| API Name | The API integration used |
| Submitted Data | Data received from the form submission |
| Sent Data to API | Data sent to the external API |
| API Response | Response returned by the API |
| API Status | Result/status of the API request |
| Created Date | Date and time when the log was created |
You can also filter logs by contact form or status, expand JSON data for a closer look, and delete selected logs when they are no longer needed.
Conclusion
Integration Logs give you a clear view of what happens when IPS – Contact Form to Any API sends your form data to an external API. By reviewing the submitted data, sent data, API response, status, and request date, you can monitor your integrations and troubleshoot failed API requests more efficiently.
With the overview statistics and filtering options, you can also quickly understand the overall performance of your API integrations without checking every request individually.