


OAuth Connections
Connecting your Shopify contact forms to platforms such as Zoho CRM often requires authentication before form submission data can be sent to the external API.
OAuth 2.0 provides a secure and convenient way to authorize these API connections without having to repeatedly manage access tokens manually. With the OAuth Connections feature in IPS – Contact Form with API, you can create an OAuth connection once, authorize it, and then reuse it across your form integrations.
In this guide, we will use Zoho CRM as an example and walk you through the complete setup process.
What Is an OAuth 2.0 Connection?
OAuth 2.0 is an authorization method that allows an application to access another platform’s APIs without requiring you to share your username and password with that application.
For example, when connecting Contact Form with API to Zoho CRM, OAuth 2.0 allows the app to obtain the authorization it needs to send your form submission data to Zoho.
The process generally works like this:
Create an application in Zoho → Get the Client ID and Client Secret → Add them to Contact Form with API → Authorize the connection → Use the connection in your API integration
Zoho APIs use OAuth 2.0 for authentication, and Zoho’s API Console provides the Client ID and Client Secret after you register your application.
Why Use OAuth 2.0?
Many CRM platforms use access tokens that can expire or become invalid over time. When authentication is managed manually using API keys or manually generated access tokens, you may need to replace credentials whenever they expire.
OAuth 2.0 makes this process easier.
Once the connection is authorized, IPS – Contact Form to Any API can manage the OAuth authorization for that connection. When the connection needs to be authorized again, you can reconnect it instead of manually replacing authentication credentials.
This offers several benefits:
- Less manual maintenance: You do not have to repeatedly replace access tokens.
- Easier reconnection: An expired or invalid connection can be authorized again from the app.
- Better security: OAuth 2.0 avoids sharing your CRM username and password with the integration.
- Reusable connections: A single OAuth connection can be selected for your API integrations.
- Simpler troubleshooting: You can test the OAuth connection directly from the OAuth Connections section.
API keys and custom headers are still useful authentication methods. However, when a platform supports OAuth 2.0, it is generally a convenient choice for reducing ongoing authentication maintenance.
Part 1: Create an OAuth Application in Zoho
Before adding the OAuth connection to IPS – Contact Form with API, you first need to create an application in Zoho and obtain its Client ID and Client Secret.
Zoho’s API Console is used to register applications and generate these OAuth credentials.
Step 1: Open the Zoho API Console
Go to, Zoho API Console
Sign in using the Zoho account that will be used to authorize the CRM connection.
Zoho’s current documentation says you register the application from the Zoho API Console and obtain the Client ID and Client Secret after creating it.
Step 2: Create a new client
In the API Console:
- Click Get Started
- Select Server-based Applications.
- Click Create.
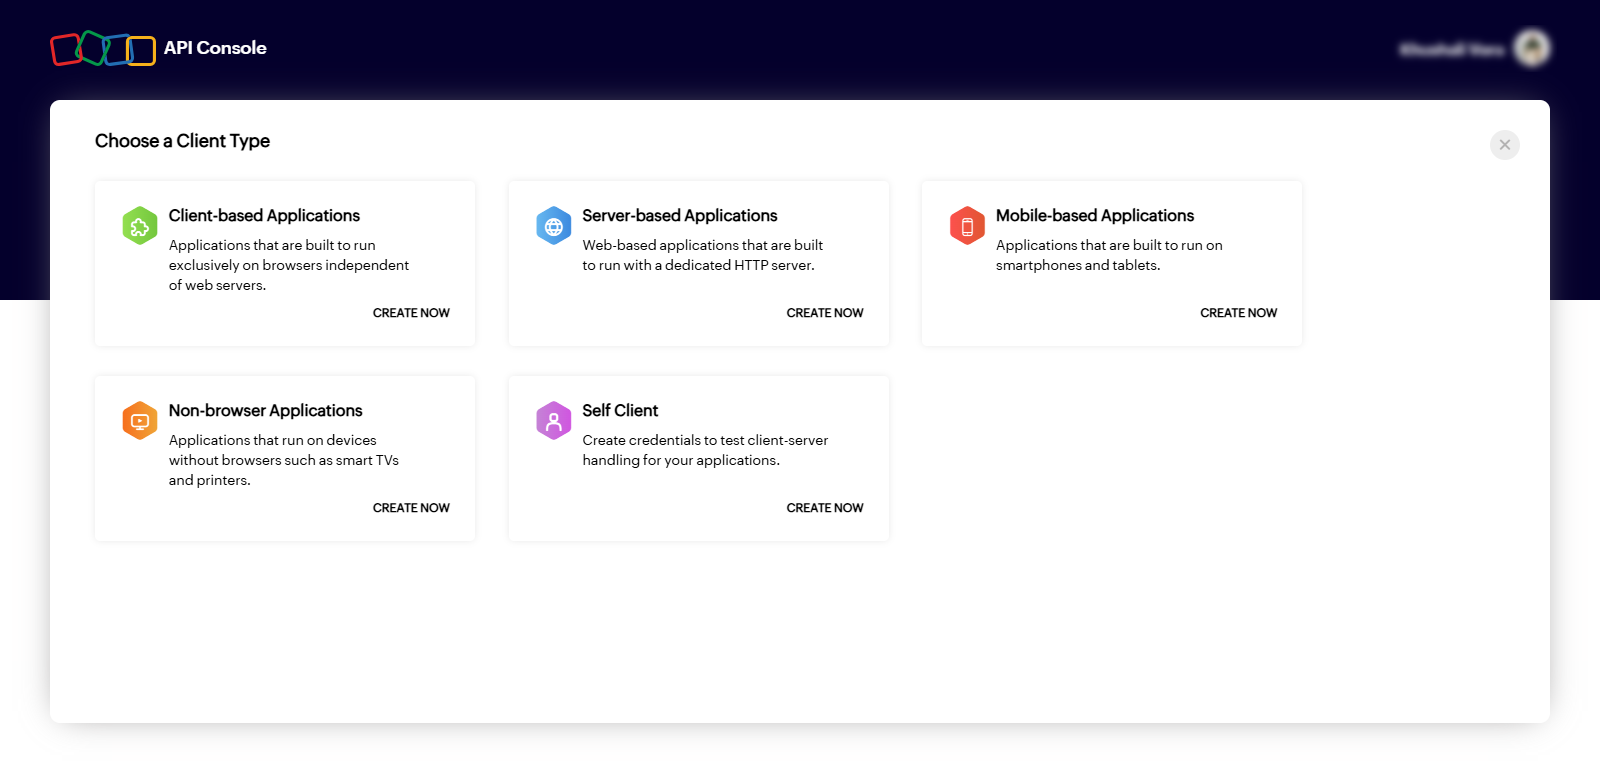
For Contact Form with API app, Server-based Applications is the appropriate application type for an application that uses a backend server to handle authorization and API communication.
Older Zoho documentation may call this client type Web-based. Zoho’s newer documentation calls it Server-based Applications.
Step 3: Enter the application details
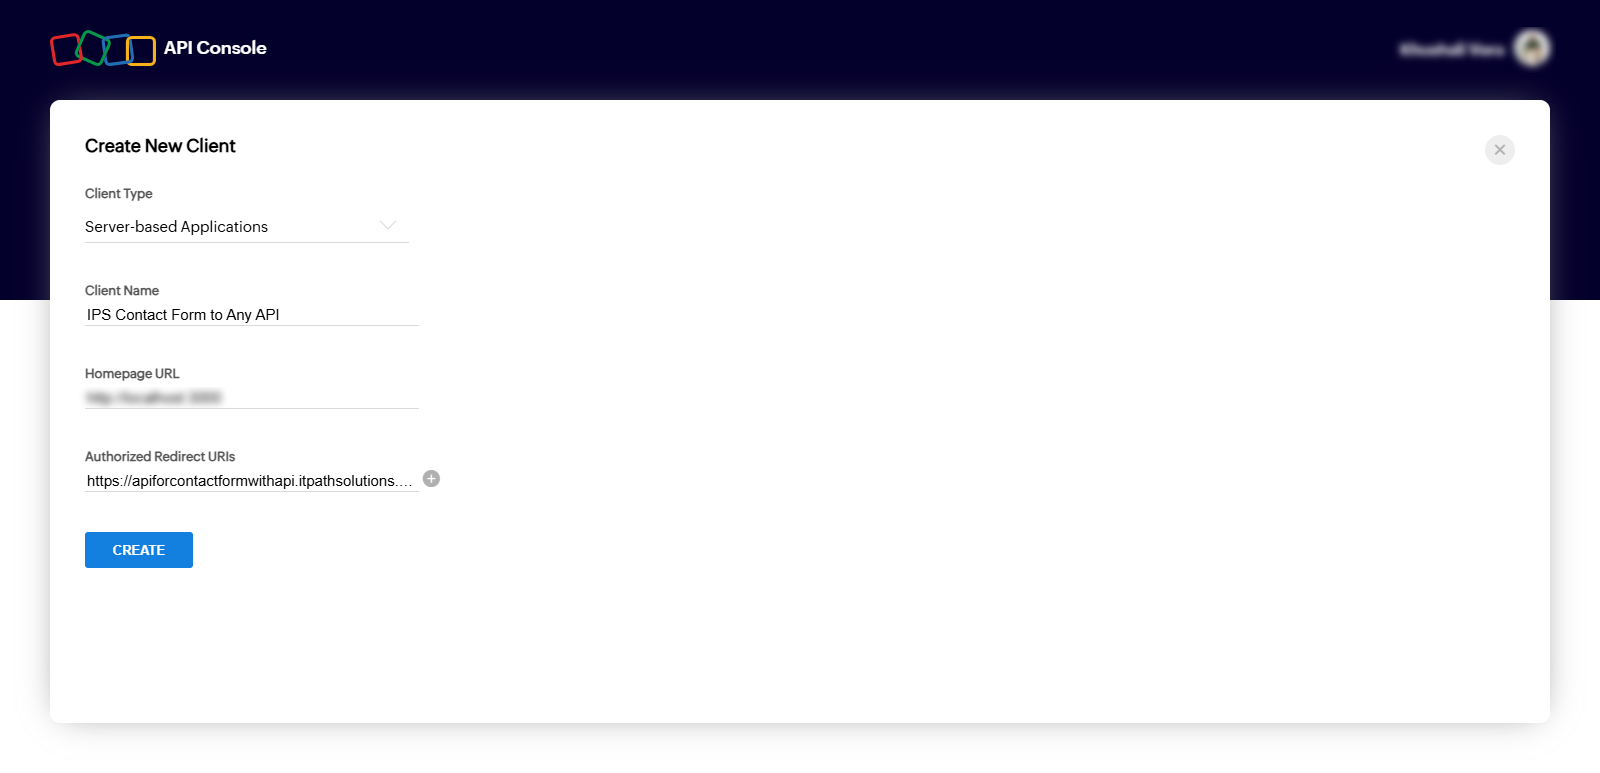
Zoho will ask for details such as:
- Client Name
You can enter something recognizable, for example:
IPS Contact Form to Any API
- Homepage URL
Enter your application’s website/homepage URL.
- Authorized Redirect URI
This is the important part.
Enter the redirect URI provided by Contact Form with API.
You can find this URI directly in the OAuth Connections section of the app.
In the current app interface, the redirect URI is displayed at the top of the OAuth Connections page:
<https://apiforcontactformwithapi.itpathsolutions.com/api/oauth/callback>
Copy exactly this URL from your IPS app and paste it into Zoho’s Authorized Redirect URI field.
Your screenshot explicitly shows that this is the URL that needs to be whitelisted in the CRM application.
The redirect URI must match the URI your application sends during the OAuth authorization request. Zoho notes that a mismatch between the registered redirect URI and the URI in the authorization request causes an invalid_redirect_uri error.
Step 4: Create the application
Click Create.
Zoho will create your OAuth application.
After successful registration, you will get:
- Client ID
- Client Secret
Zoho says these credentials are available in the application’s Client Secret tab.
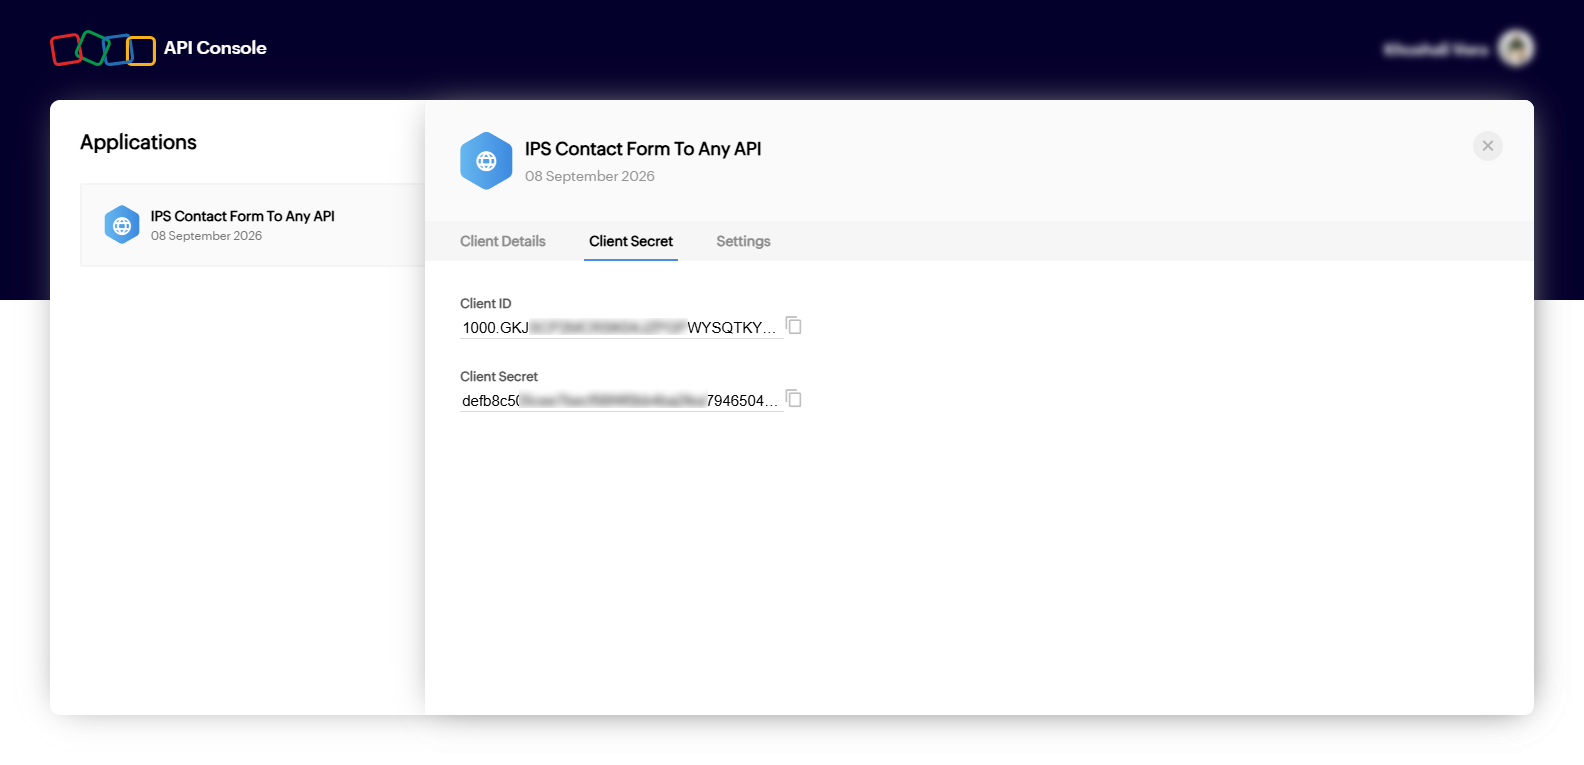
Security note: Your Client Secret is sensitive information. Do not share it publicly or expose it in client-side code.
Step 5: Copy the credentials into your Contact Form with API app
Go back to your Contact Form with API in your Shopify store and open:
OAuth Connections → Add Connection
Then enter:
| IPS field | What to enter |
|---|---|
| Connection name | Any name you want, e.g. Zoho CRM |
| Provider | Zoho CRM |
| Zoho data center | Select the data center where the Zoho CRM account is located |
| Client ID | The Client ID generated by Zoho |
| Client Secret | The Client Secret generated by Zoho |
| Scope | ZohoCRM.modules.ALL |
Your screenshot already shows ZohoCRM.modules.ALL as the default scope.
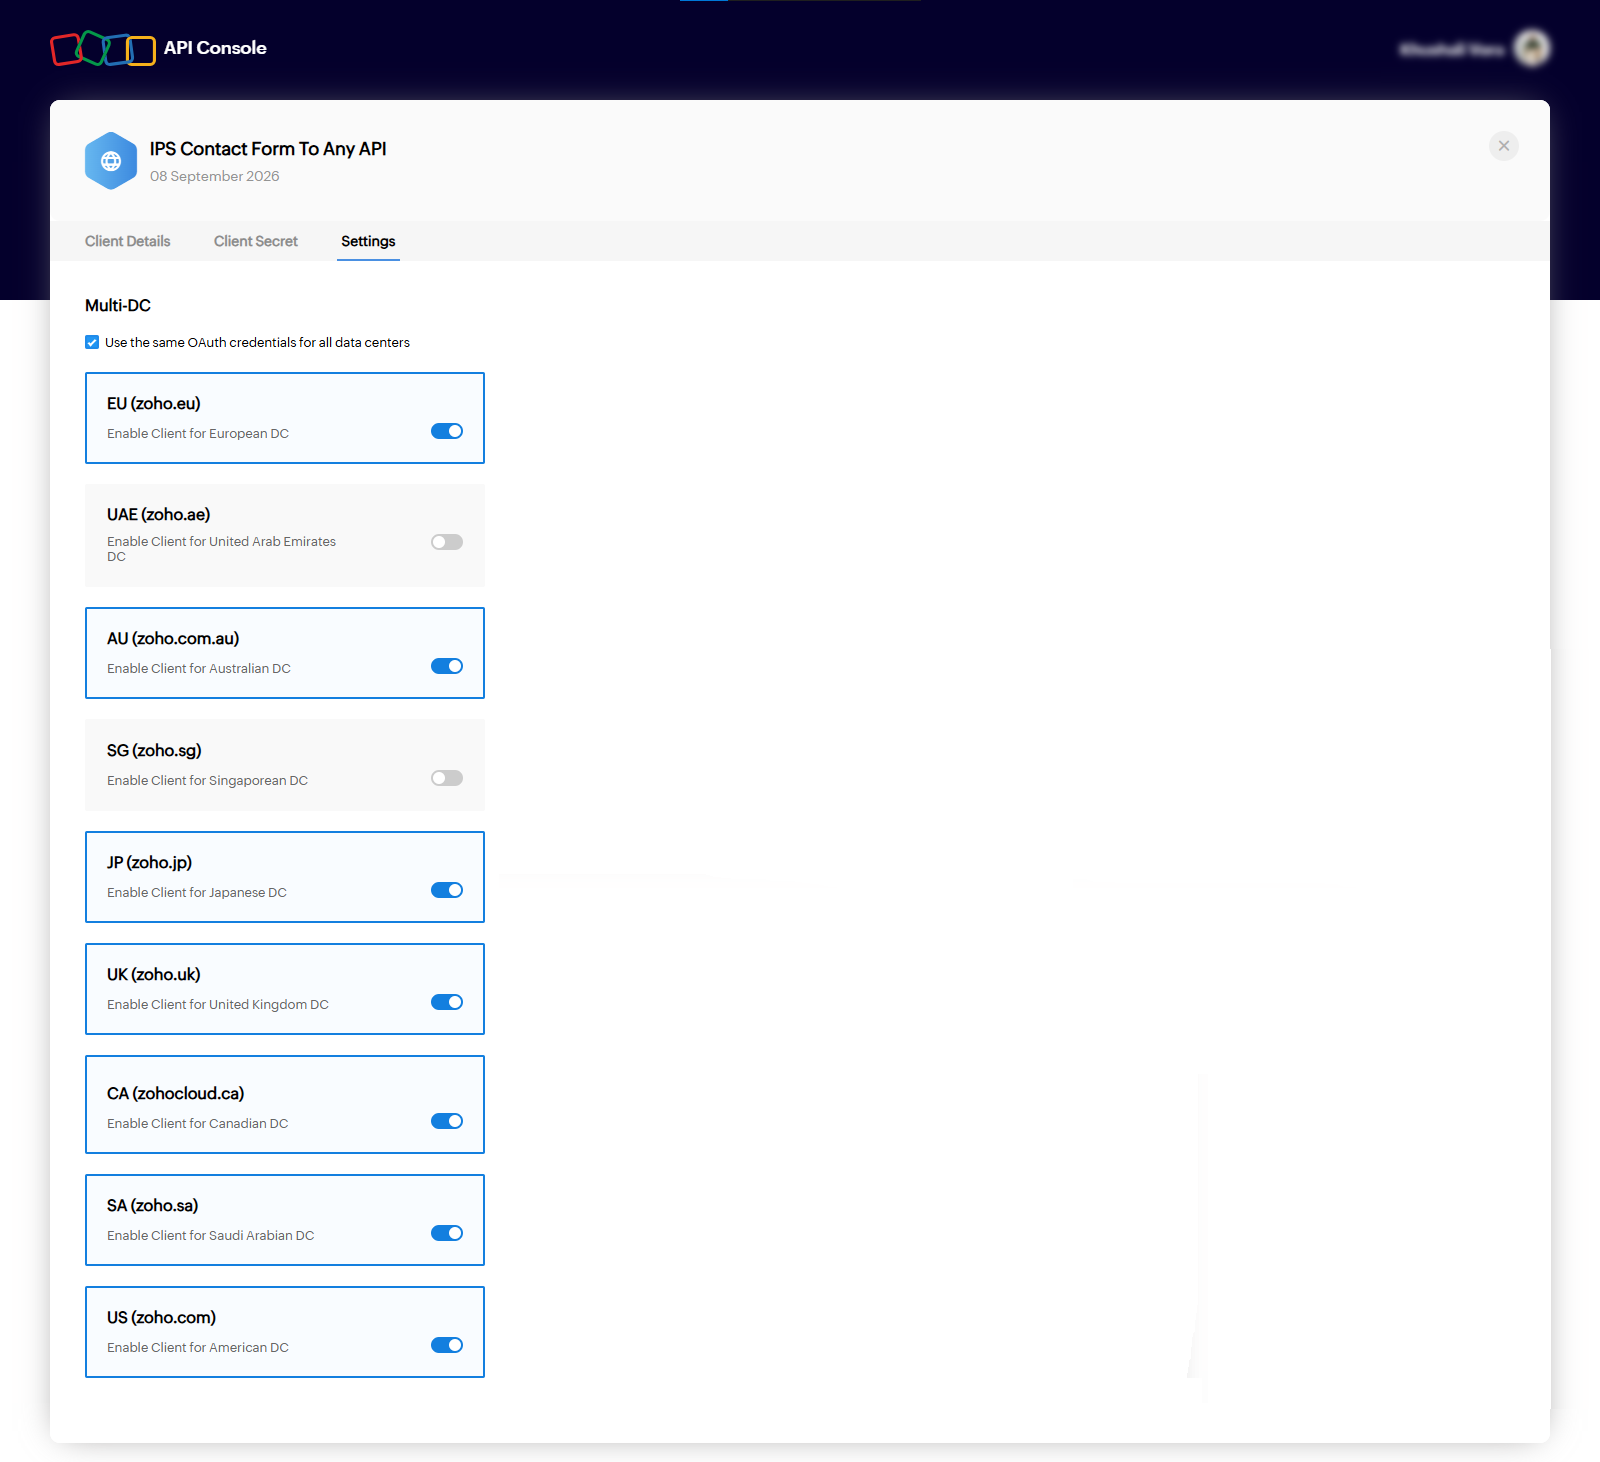
Step 6: Make sure the data center is correct in the settings
This is the most important setting.
Check the “Use the same OAuth credentials for all data centers” checkbox.
With this settings, Zoho says that the Client ID remains common across data centers, while the Client Secret can either be different for each data center or shared across them. By selecting this option, you can use the same OAuth credentials across the enabled DCs.
Zoho data center → zoho.com (US)
That is correct only if the Zoho CRM account is hosted in the US data center.
Zoho uses different Accounts URLs depending on the data center. For example, .com for US, .eu for Europe, and .in for India.
So the data center selected in IPS should correspond to the user’s Zoho account.
Part 2: Add the OAuth Connection in Contact Form with API
Once you have your Zoho Client ID and Client Secret, you can add the OAuth connection to IPS – Contact Form with API.
Step 1: Open OAuth Connections
From your Shopify admin, open:
Apps → IPS – Contact Form with API → OAuth Connections
The OAuth Connections page allows you to create and manage your OAuth connections.
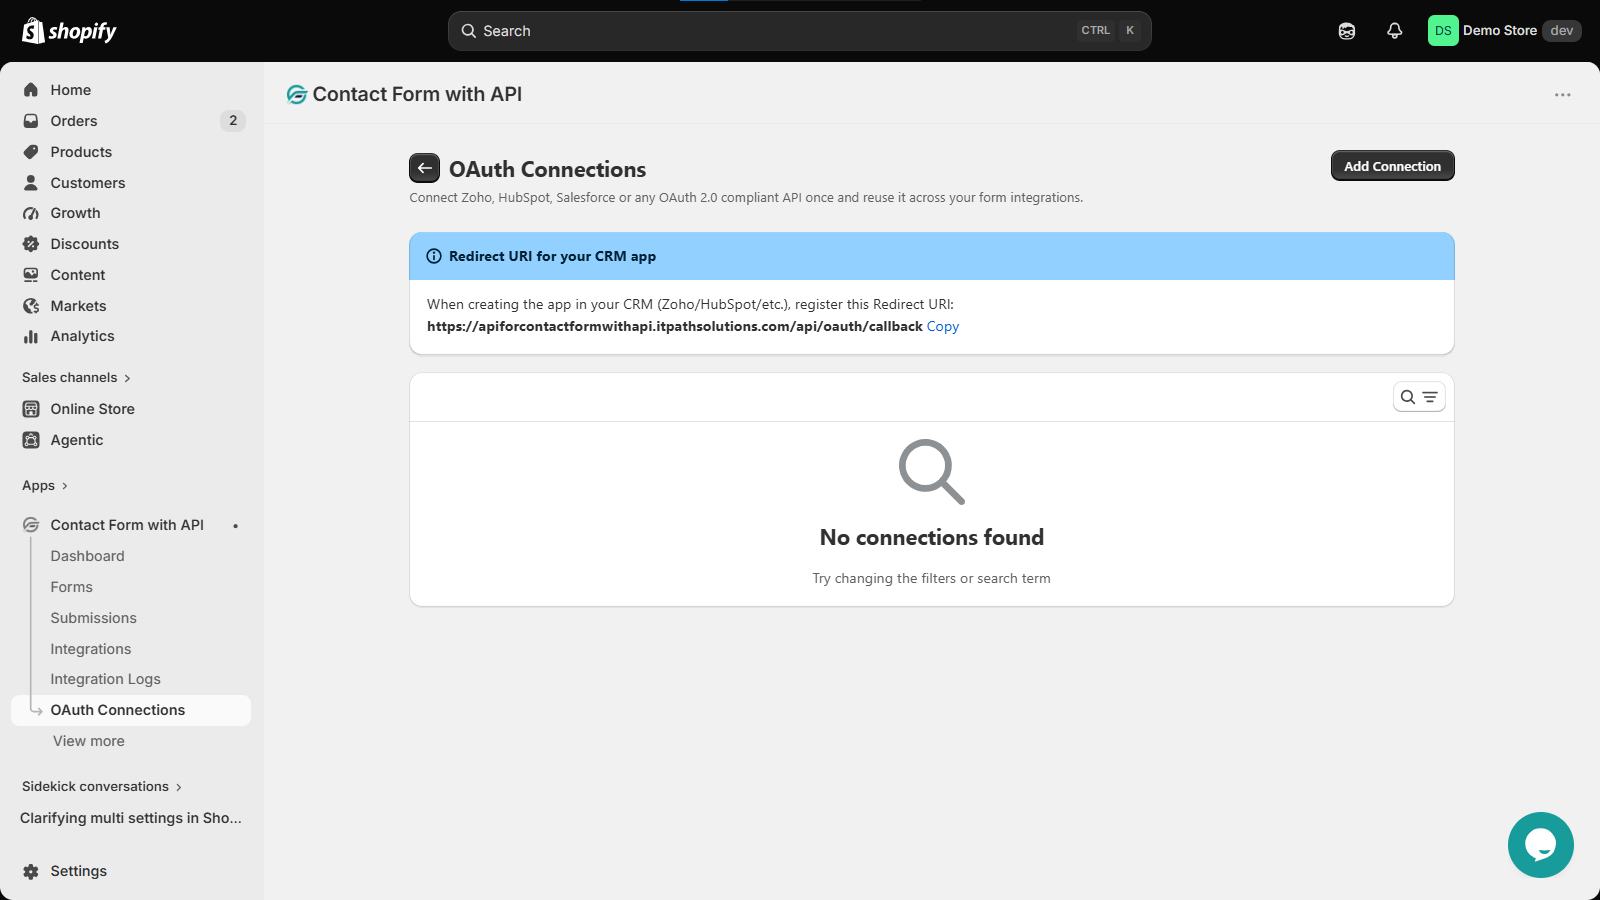
Step 2: Click Add Connection
Click the Add Connection button.
A window will appear where you can enter the details for your OAuth connection.
Step 3: Enter the connection details
Fill in the required fields.
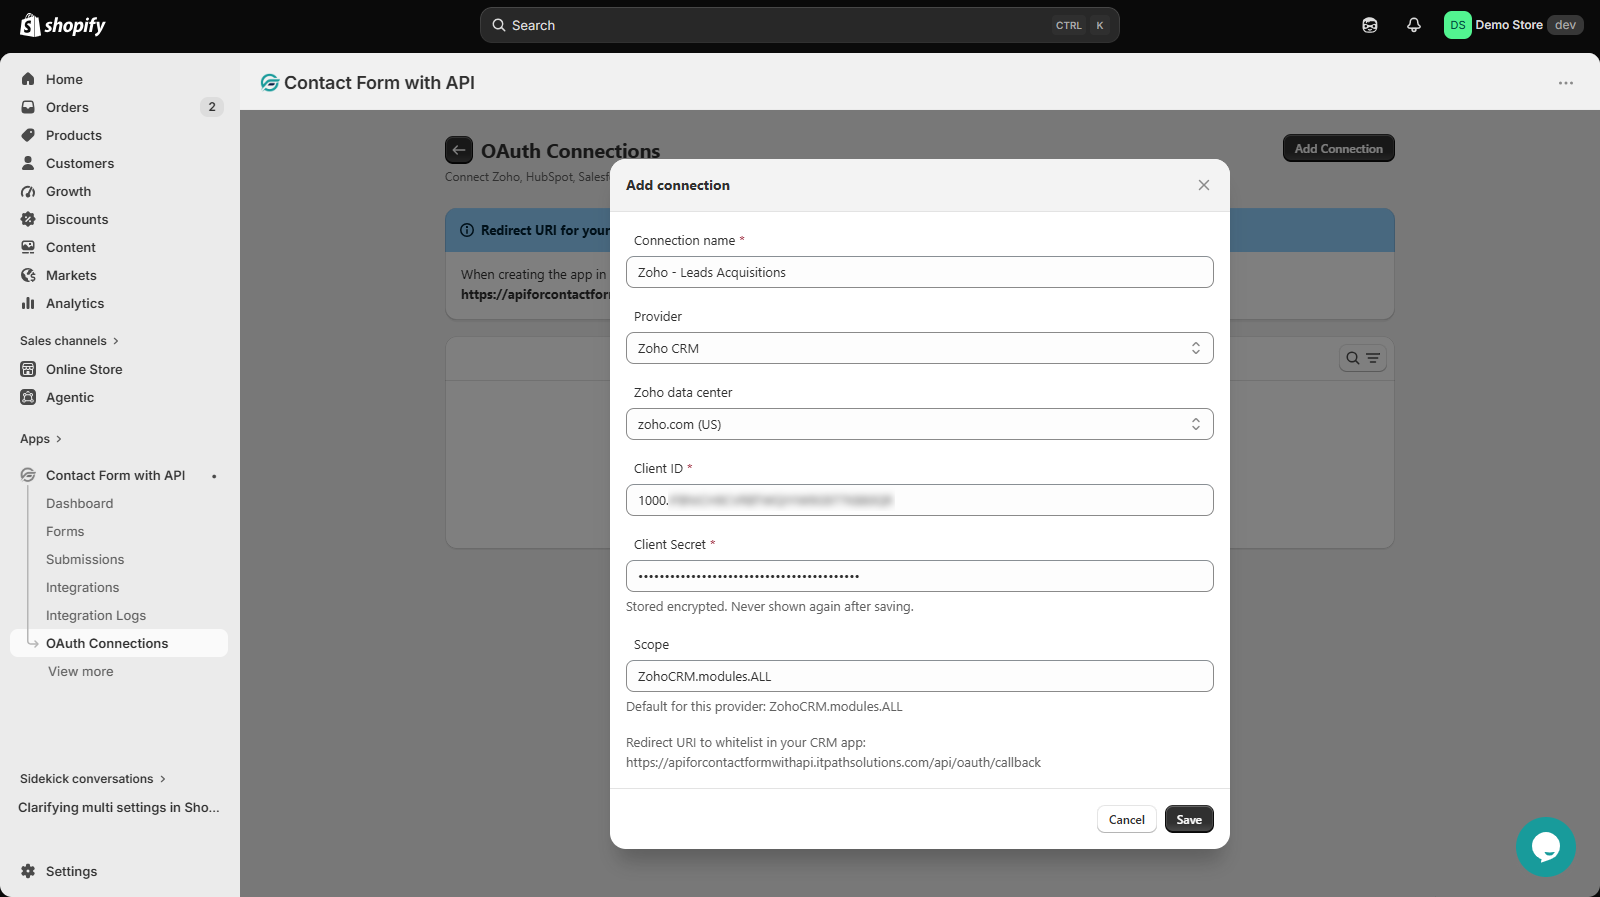
- Connection name
Enter a name that helps you identify the connection.
For example: Zoho - Leads Acquisitions
This is the name that you will later see when selecting an OAuth connection inside your integration.
- Provider
Select: Zoho CRM
- Zoho data center
Select the Zoho data center associated with your Zoho account.
For example, the screenshot shows:
zoho.com (US)
Make sure you select the correct data center for your Zoho account.
- Client ID
Enter the Client ID you obtained from the Zoho API Console.
- Client Secret
Enter the Client Secret you obtained from the Zoho API Console.
The app securely stores the Client Secret and does not display it again after saving.
- Scope
Enter the OAuth scope required for your Zoho integration.
For the Zoho CRM example shown in the app, the default scope is:
ZohoCRM.modules.ALL
The scope determines what access the OAuth connection requests from Zoho.
Step 4: Save the connection
After entering all the required information, click Save.
Your OAuth connection will now be added to the OAuth Connections dashboard.
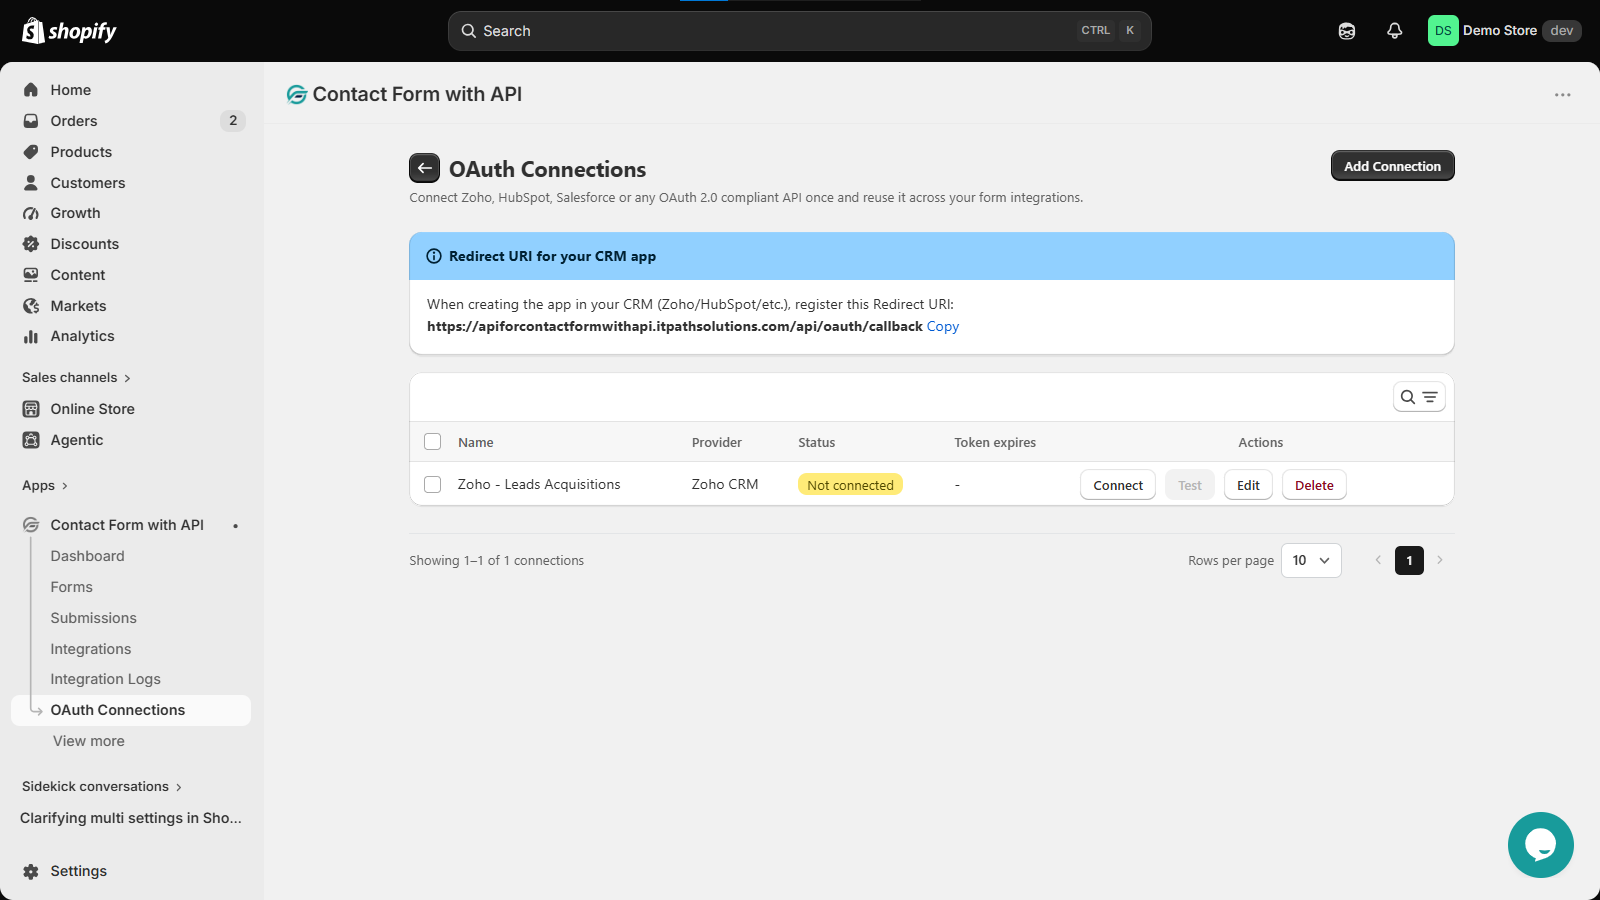
Part 3: Authorize the OAuth Connection
Saving the connection adds its configuration, but you still need to authorize it with Zoho.
Step 1: Connect the OAuth connection
From the OAuth Connections dashboard, find the Zoho connection you just created.
Click Connect. (As seen in the image attached in the above section)
This will start the OAuth authorization process.
Step 2: Authorize the connection in Zoho
You will be taken through the Zoho authorization process.
Sign in to Zoho when prompted and allow the required permissions for the connection.
Once authorization is completed, Zoho will redirect you back to IPS Contact Form to Any API using the registered redirect URI.
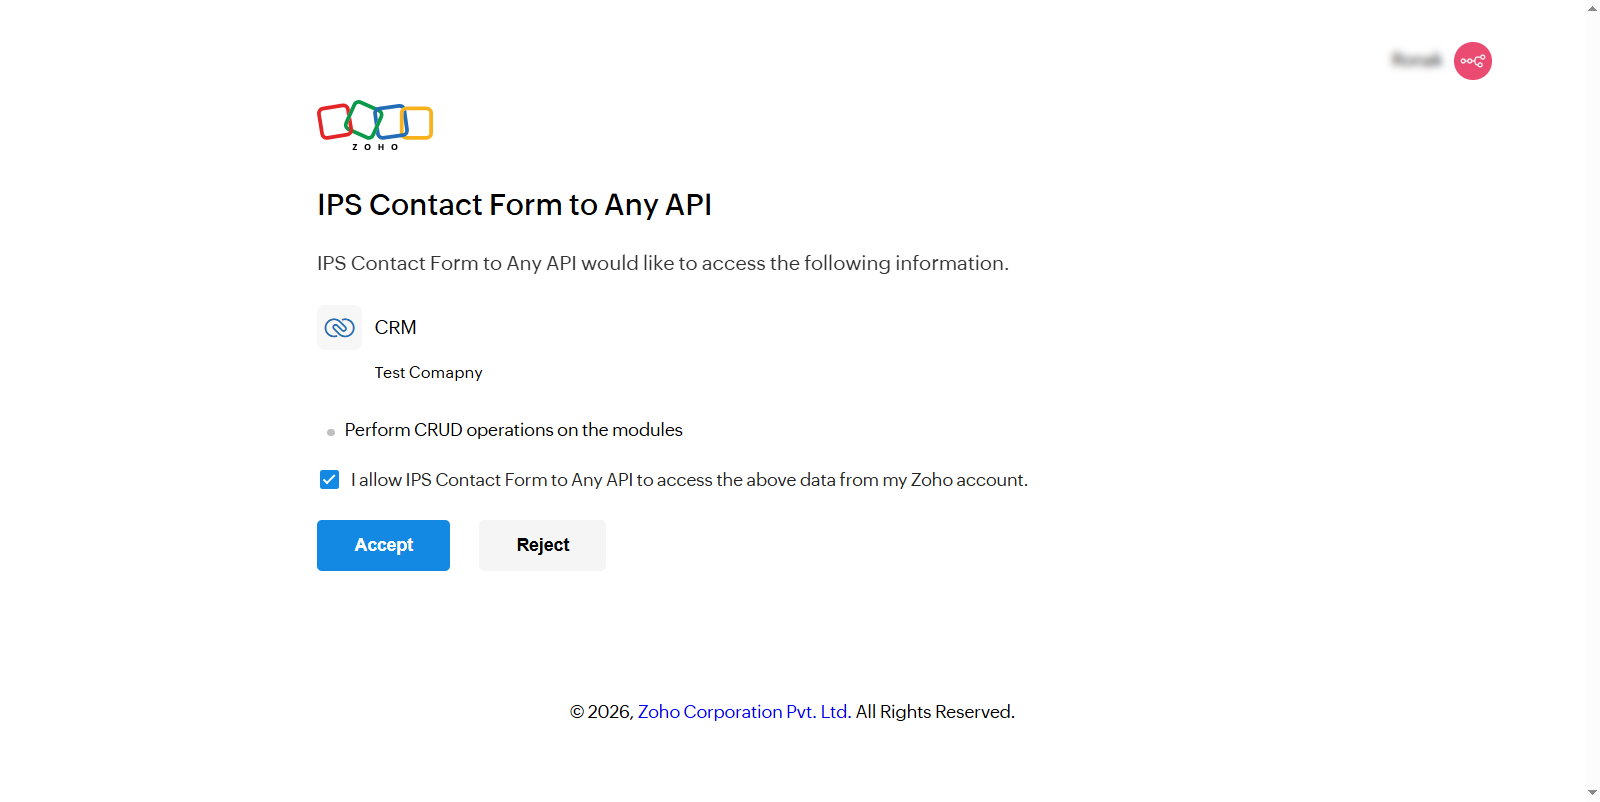
Step 3: Test the connection
After authorization is complete, return to the OAuth Connections dashboard.
Use the Test option for the Zoho OAuth connection to verify that the connection is working correctly.
Testing the connection before using it in an integration helps confirm that the authentication setup is valid.
Part 4: Use the OAuth Connection in an Integration
Once your OAuth connection has been successfully authorized and tested, you can use it when creating an API integration.
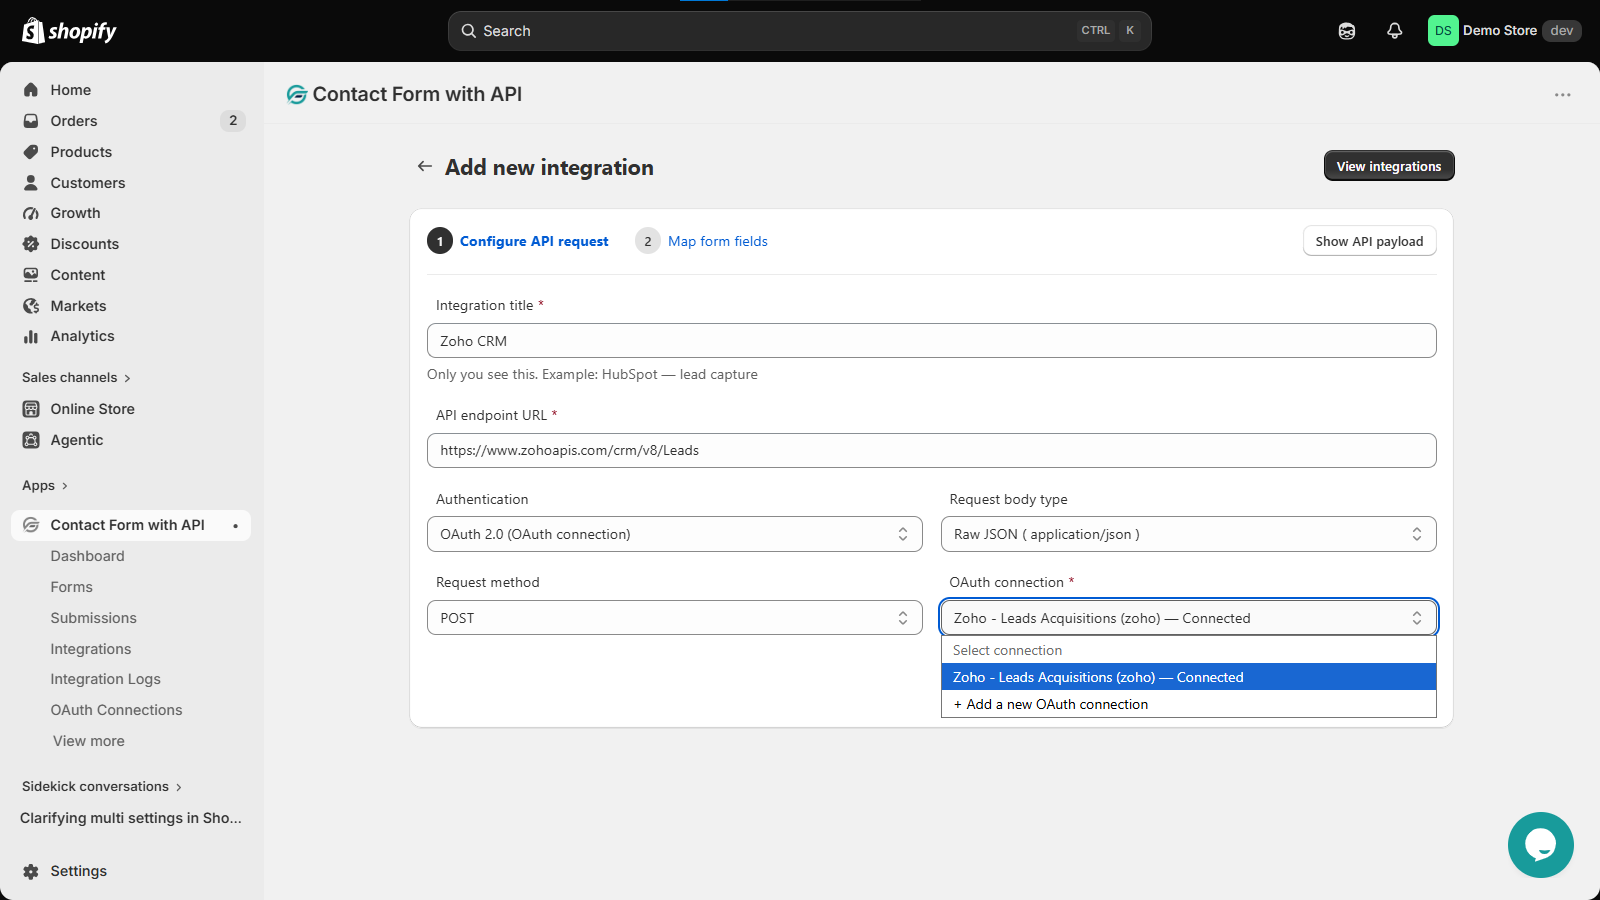
Step 1: Go to Integrations
Go to Integrations under Contact Form with API
Step 2: Add a new integration
Click Add New Integration.
You will be taken to the integration configuration screen.
Step 3: Select OAuth 2.0 authentication
Under Authentication, select:
OAuth 2.0 (OAuth connection)
This tells IPS – Contact Form with API to use an OAuth connection for authenticating the API request.
Step 4: Keep the default request settings
For this setup, you can leave the following fields with their default values:
- Request body type: Raw JSON (
application/json) - Request method: POST
You can change these later when your API requires different settings.
Step 5: Select your OAuth connection
Under OAuth connection, open the dropdown.
You will see the OAuth connection you created earlier.
For example, we named the connection:
Zoho - Leads Acquisitions
you will see Zoho – Leads Acquisitions as an available option.
Select the connection you want to use.
The important point here is that you do not need to enter your Zoho Client ID and Client Secret again while configuring the integration. The integration uses the OAuth connection you already created and authorized.
Step 6: Complete the integration setup
Continue configuring your API endpoint and form field mapping according to your API requirements.
Refer the Integrations section for this process.
Once the integration is saved and connected to the appropriate form, the form submission data can be sent to the API using the selected OAuth 2.0 connection.
Get Started with OAuth 2.0 Integration
With the OAuth 2.0 connection feature in IPS – Contact Form with API, you can connect supported platforms such as Zoho CRM without repeatedly entering authentication credentials for every integration.
This makes authentication easier to manage and reduces the ongoing maintenance associated with manually managed access tokens.