


Integrations
Creating an integration in IPS – Contact Form to Any API lets you send form submission data to an external service through its API. You can connect your form to different platforms by providing the API endpoint, authentication details, and the data you want to send.
This guide walks you through the process using HubSpot as an example.
Note: The API endpoint, authentication method, request body type, and request method used in this example are specific to the HubSpot setup shown here. The options can be changed when setting up an integration for another API.
Before you begin
Make sure you have:
- Access to your Shopify admin
- IPS – Contact Form to Any API installed in your store
- Access to your HubSpot Developers account
- A HubSpot app with an access token
Step 1: Get the HubSpot API endpoint
First, you need the API endpoint that IPS – Contact Form to Any API will send your form data to.
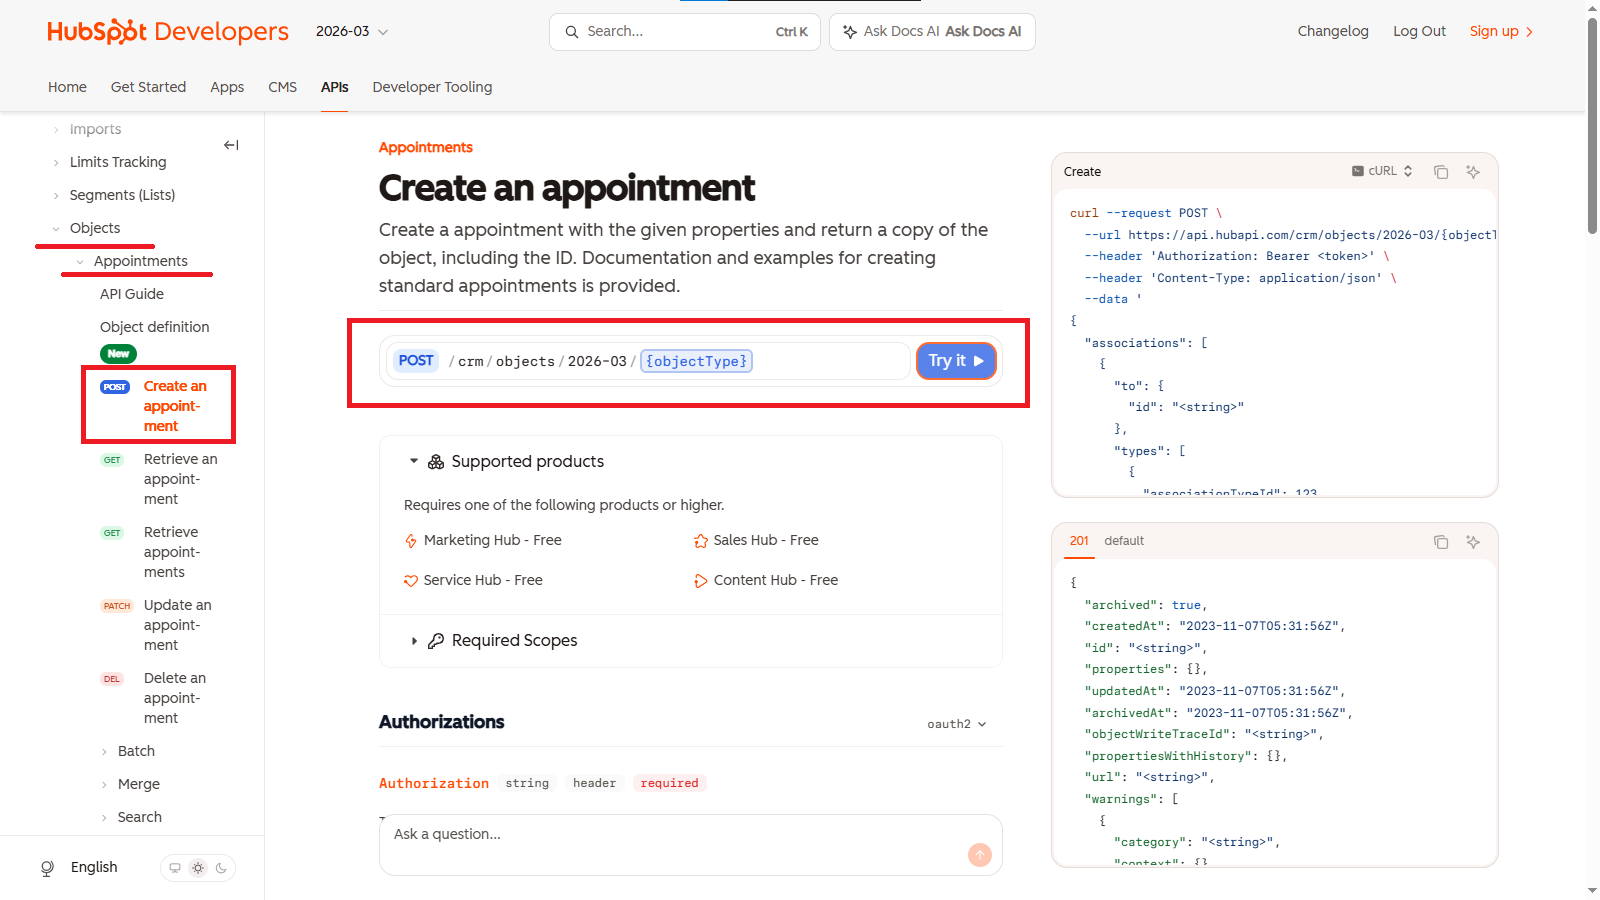
- Go to HubSpot Developers.
- Open APIs from the top navigation.
- In the left-side table of contents, scroll down to CRMs.
- Open Objects and select Appointments.
- Select Create an appointment.
- Copy the API endpoint URL shown on the page.
Keep this URL handy. You will need it when creating the integration in Shopify.
Step 2: Start a new integration in Shopify
Once you have the HubSpot endpoint, return to your Shopify admin.
- Open IPS – Contact Form to Any API.
- Go to Integrations.
- Click Add new integration.
You will be taken to the Configure API request screen.
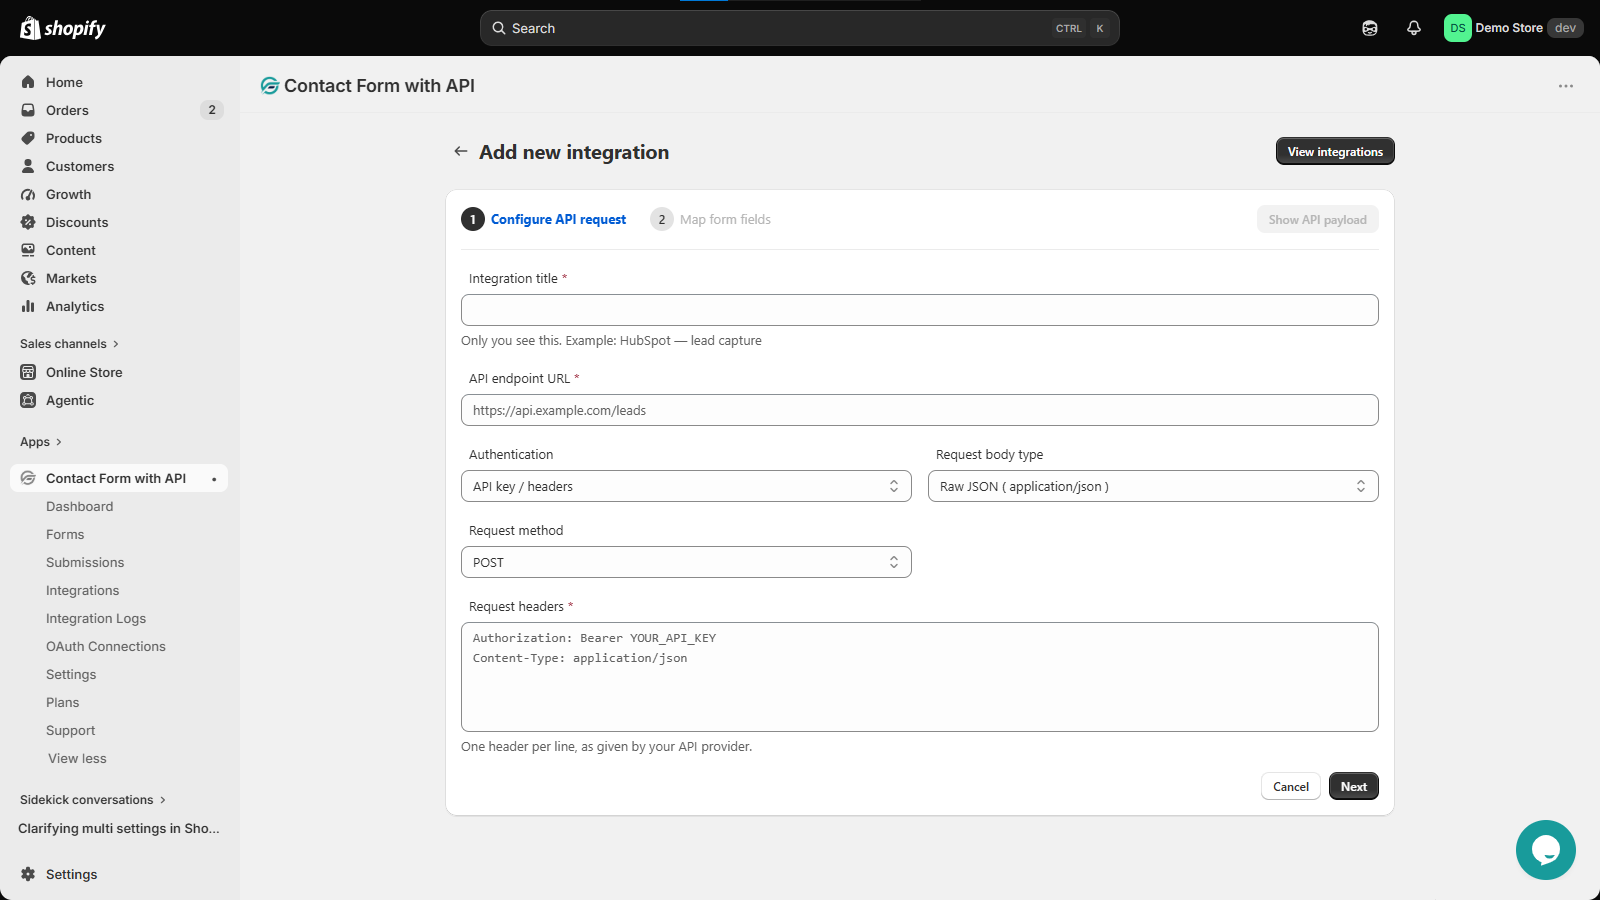
Configure the API request
Fill in the fields as follows:
- Integration title – Enter a name that helps you identify the integration. For example:
HubSpot Integration. This title is used only to identify the integration within the app. - API endpoint URL – Paste the HubSpot API endpoint URL you copied earlier.
- Authentication – Select API key/headers.
- Request body type – Select Raw JSON (application/json).
You can change the Authentication and Request body type options when working with an API that requires a different setup.
- Request method – Keep this set to POST.
Your configuration should now contain the basic information needed to send the request to HubSpot.
Step 3: Get your HubSpot access token
The integration also needs permission to make API requests to your HubSpot account.
- Go back to HubSpot Developers.
- Select Sign up.
- Continue with your domain.
- Open Legacy App.
If you already have a legacy app, open it. Otherwise, create a new one.
- Open the Auth section of the app.
- Find the Access token.
- Copy the access token.
Keep the token secure and do not share it publicly.
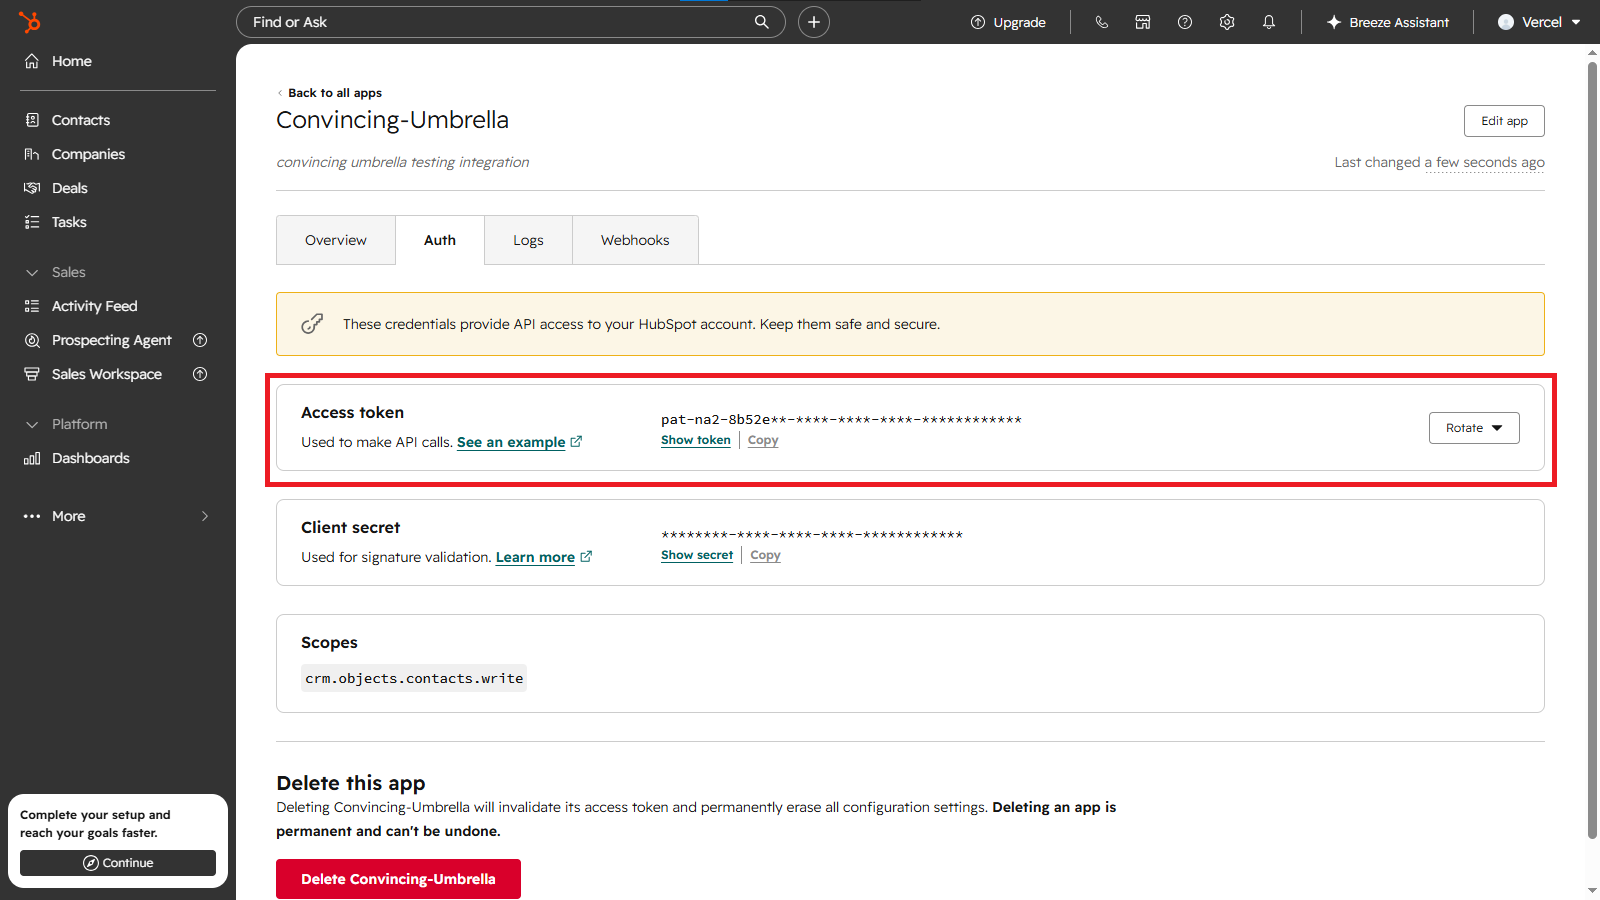
Step 4: Add the access token to the request headers
Return to the integration setup in IPS – Contact Form to Any API.
In the Request headers field, enter the headers required by the API.
For the HubSpot example, the format is:
Authorization: Bearer YOUR_ACCESS_TOKEN Content-Type: application/json
Replace YOUR_ACCESS_TOKEN with the access token you copied from HubSpot.
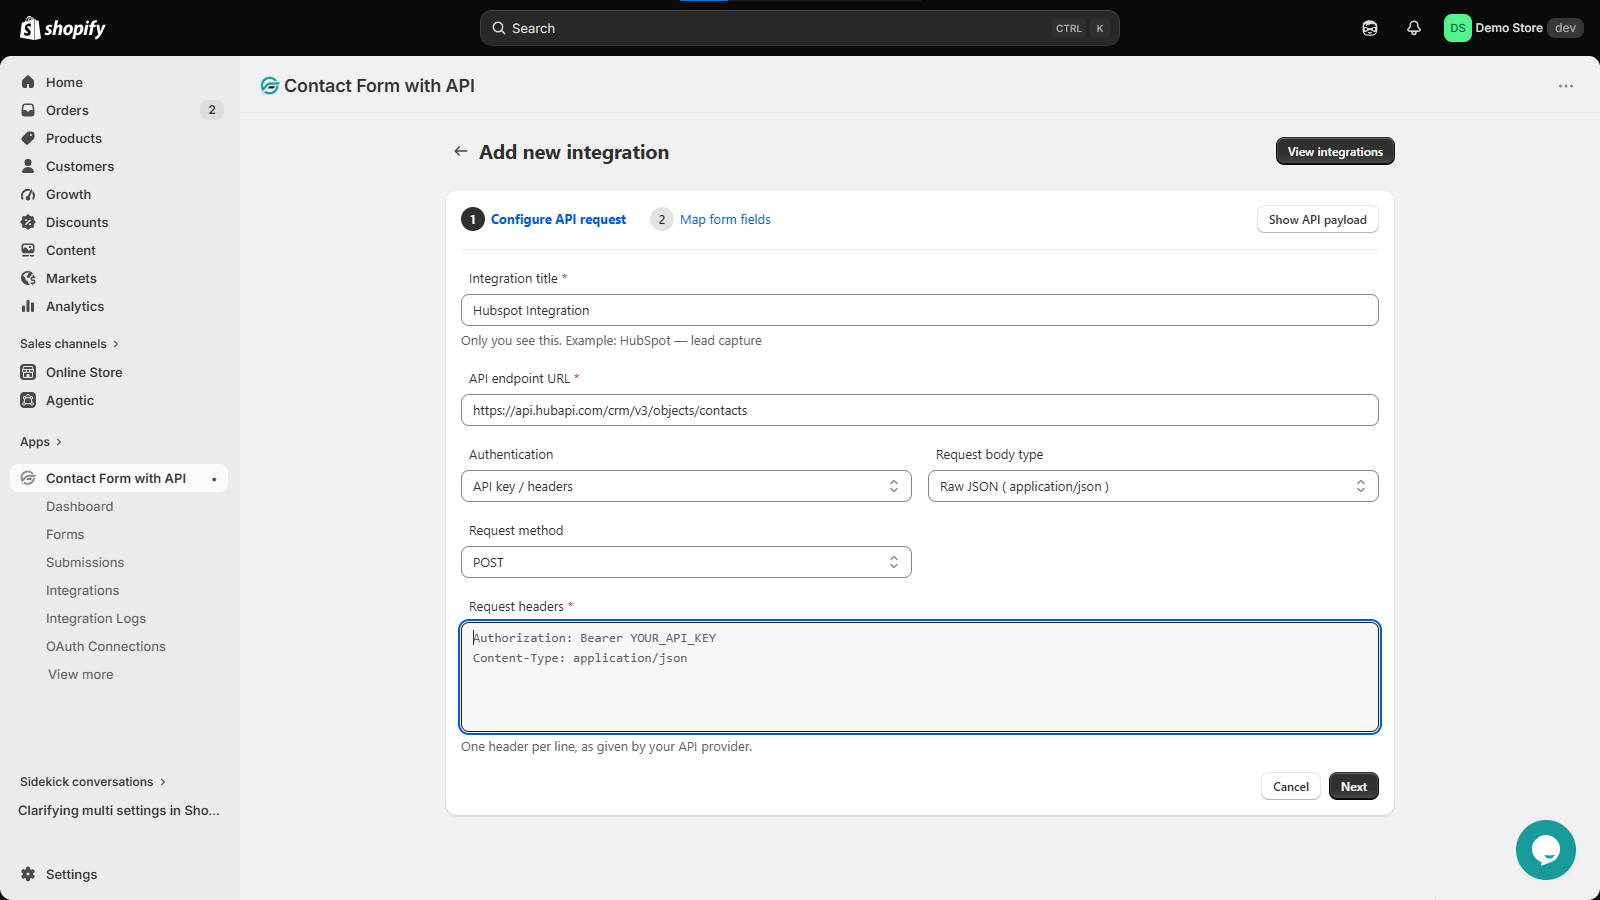
The app accepts one header per line. Make sure the header names, values, and formatting match what is required by the API you are connecting to.
Once the request details are filled in, click Next.
Step 5: Select the contact form
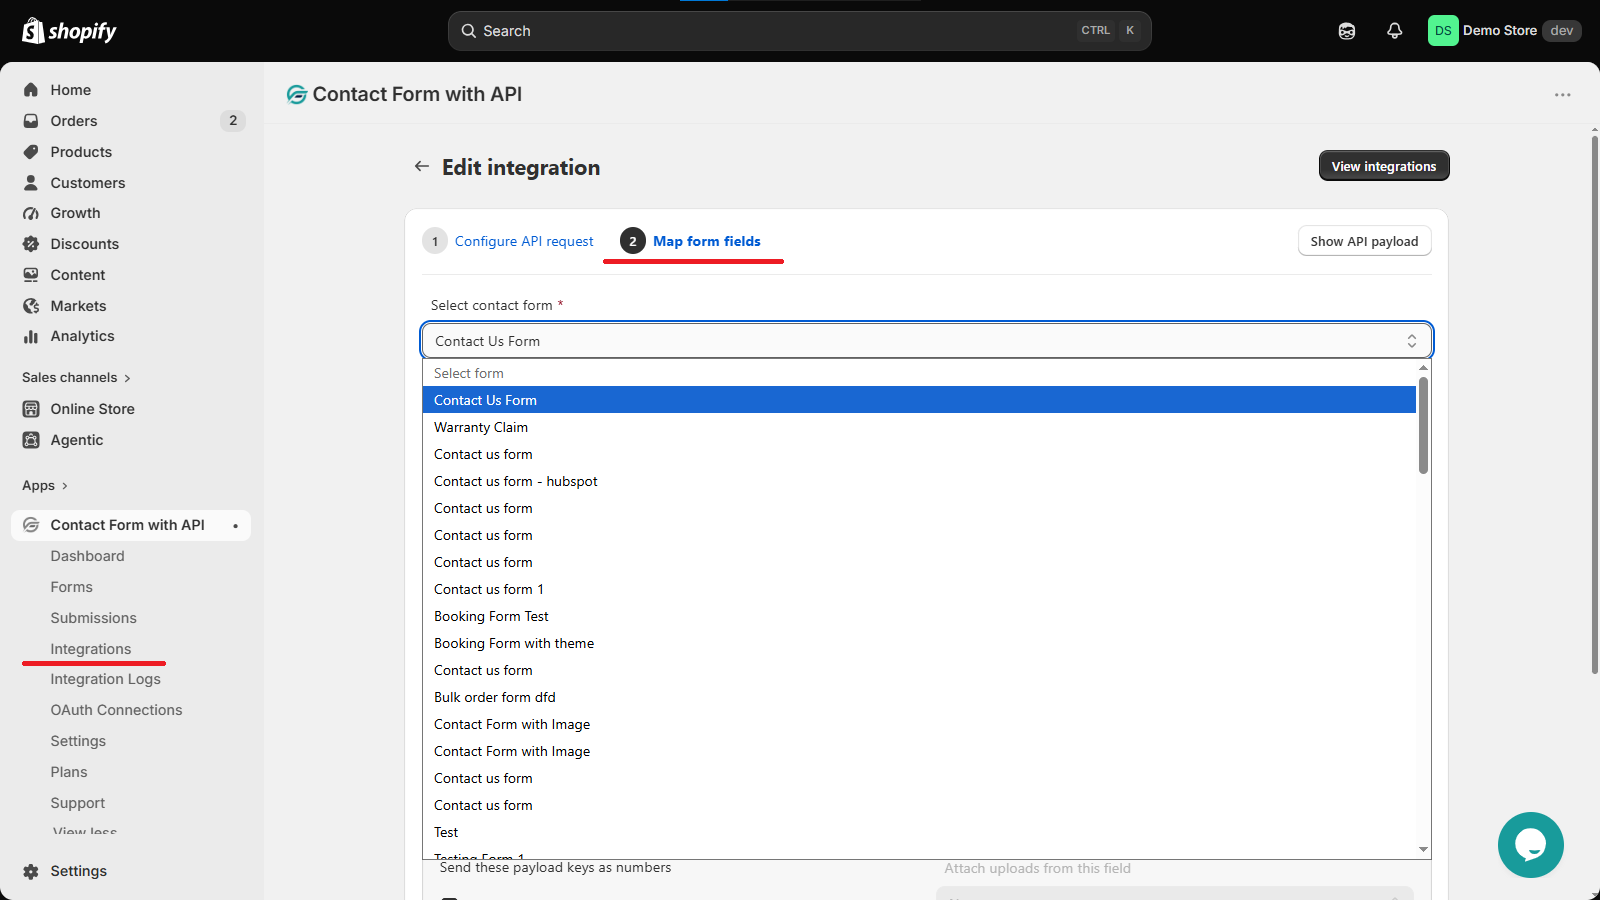
The next screen is Map form fields.
Start by selecting the contact form that should send its submissions to HubSpot.
Choose the form you want to connect from the Select contact form dropdown.
Step 6: Create the JSON payload
The JSON payload determines how the form data is sent to the API.
You can use the available form fields shown above the JSON editor to insert fields into your payload. The app also provides predefined tags for additional submission information.
For example, your payload might look like this:
{ "first_name": "[firstName]", "email": "[email]", "source": "Shopify contact form", "submitted_at": "[_submitted_date_time]" }
The exact JSON structure you use depends on the data required by the API.
The app provides options such as Beautify JSON and Add sample JSON to help while working with the payload.
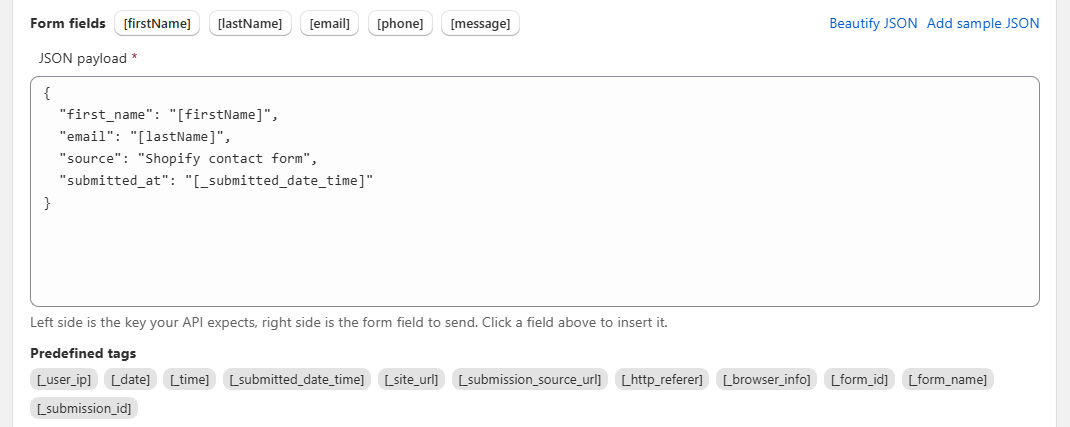
Tip – The key on the left side of each JSON entry is the field name expected by the API. The value on the right is the form field or predefined tag whose data will be sent.
Step 7: Configure additional settings
Below the JSON payload, you will find Additional settings.
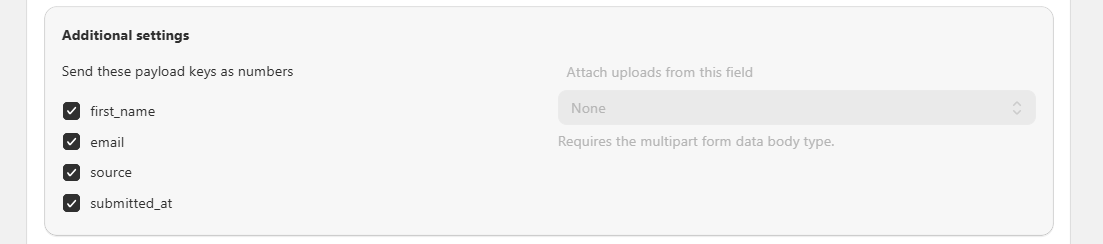
Depending on your requirements, you can configure options such as:
- Sending selected payload keys as numbers
- Attaching an uploaded file to a form field
- Sending the request only when a specific condition is met
You do not need to change these settings unless your API request requires them.
Step 8: Add conditions to the integration
You can use conditions to control when the integration should send a request. This is useful when you only want to send form submissions to the connected API when specific information in the submission matches your requirements.
To add a condition, enable Only send when a condition is met.
When the condition is not met, the API request is skipped and the submission is logged as skipped.
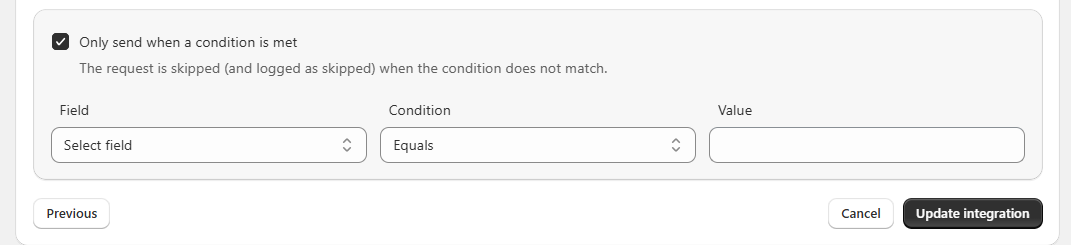
Configure a condition
Once you enable the option, configure the condition using the following fields:
1. Field
Select the form field that you want to check. The available fields depend on the contact form you selected. For example, you may see First Name, Last Name, Email, Phone, and Message.
2. Condition
Choose how the selected field should be compared. The available options are:
- Equals: Sends the request when the field exactly matches the value you enter.
- Does not equal: Sends the request when the field does not match the value.
- Contains: Sends the request when the field contains the specified value.
- Does not contain: Sends the request when the field does not contain the specified value.
- Is empty: Sends the request when the selected field has no value.
- Is not empty: Sends the request when the selected field contains a value.
3. Value
Enter the value that the selected field should be compared against. This is used with conditions such as Equals, Does not equal, Contains, and Does not contain.
For example, suppose you only want to send the submission to your API when the Email field contains a specific domain. You can configure the condition as:
| Field | Condition | Value |
|---|---|---|
| Contains | @example.com |
With this setup, the integration request is sent only when the email address contains @example.com. Submissions that do not meet the condition are skipped.
Once you have configured the condition, review the integration settings and click Save integration.
Note: Use conditions only when you need to control which submissions are sent. Leave Only send when a condition is met disabled to send every submission from the selected form to the API.
Step 9: Review and save the integration
Before saving the integration, review all the details you entered.
Check the:
- Integration title
- API endpoint URL
- Authentication method
- Request body type
- Request method
- Request headers
- Contact form
- JSON payload
- Additional settings and conditions
Once everything looks correct, click Save integration.
Your HubSpot integration will now be saved and will appear in the Integrations section of IPS – Contact Form to Any API.
That’s it
You have now connected a Shopify contact form to HubSpot using IPS – Contact Form to Any API. The same integration process can be used for other APIs as well. You just need to provide the endpoint, authentication details, request format, and payload required by the service you want to connect.